While the EpicOS System is installed on the site, a default WAN Profile is created with the priority of the enabled WANs configured in this WAN Profile and assigned to the default Access Network. However, user can create multiple WAN profiles of their choice.
WAN Profile Types
There are multiple profile options available, such as Strict Priority and Bonding.
Strict Priority
This is a configuration where WAN links are arranged in a priority order where there is never more than one WAN link for a given priority.
Bonding
It is possible to configure any individual VLAN, subnet or even device in a way that the Internet traffic that entity is carried by more than one WAN link, based on conditions. This feature is called bonding, and the set of WAN links is called the ‘bonded set’. Within WAN profiles, if any priority levels contain more than one WAN link, then those links in that priority level form a bonded set. It should be noted that, should any one link in a bonded set fail, while new TCP or UDP sessions would be assigned to one of the surviving links of the bonded set, any sessions currently using that failed link will be lost.
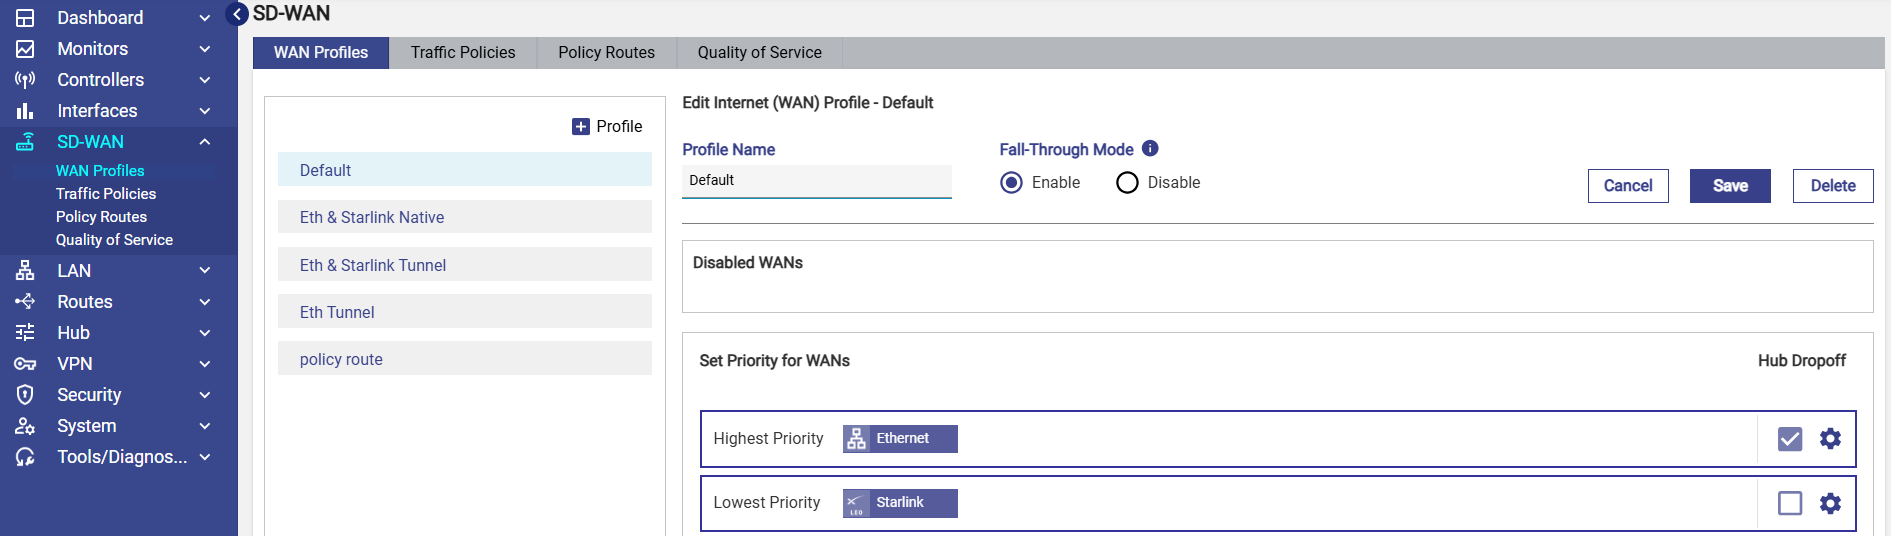
Creating a new WAN Profile
To create a WAN profile, perform the following steps.
-
Select the SDWAN option from the side bar. The WAN Profiles tab will be selected by default.
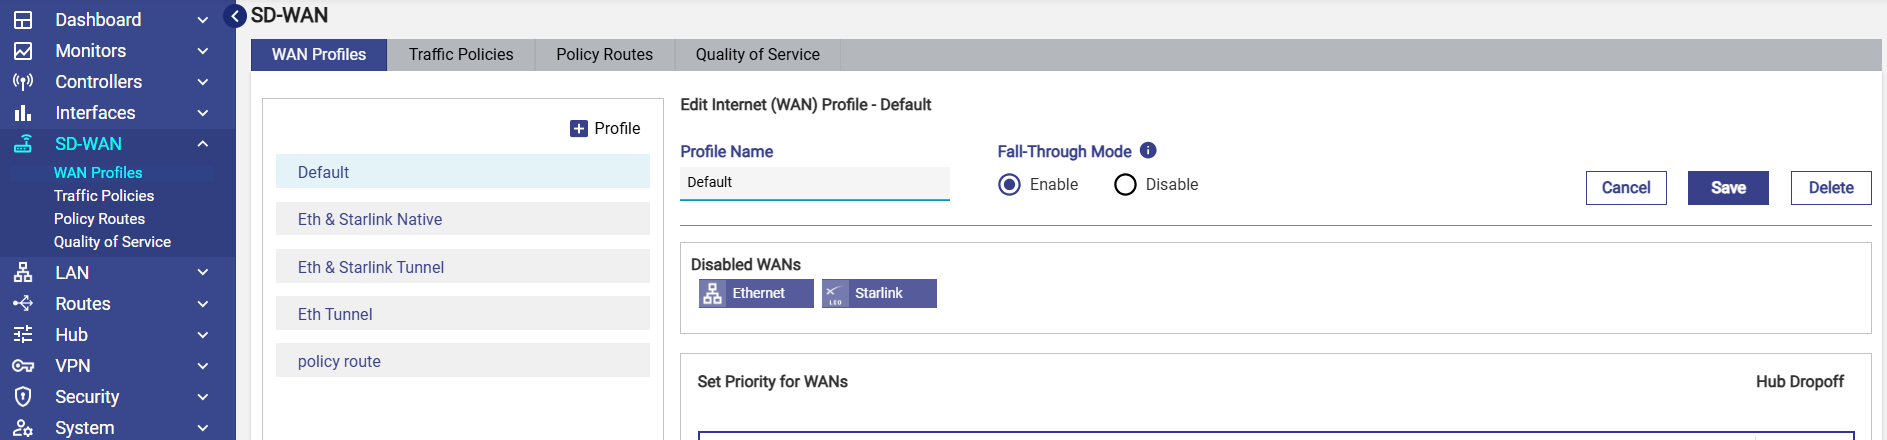
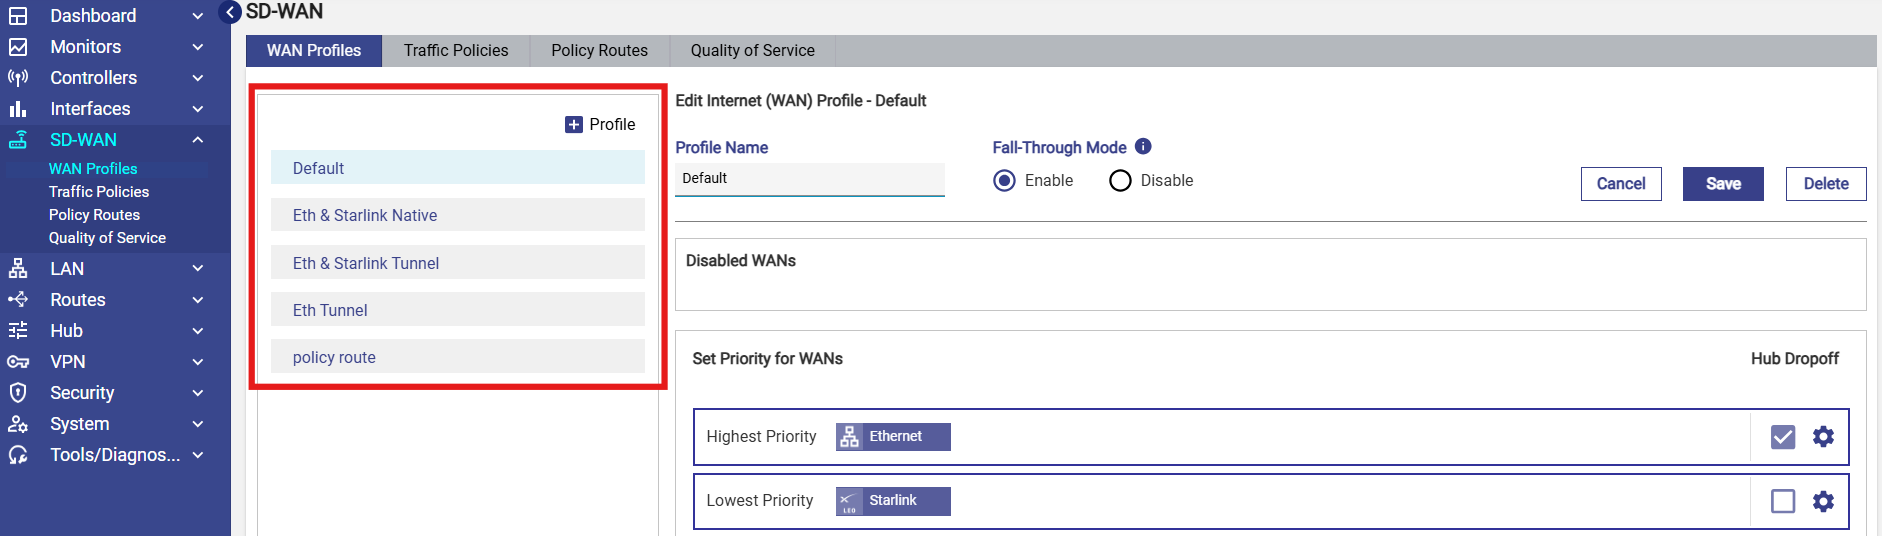
Initially, the Default WAN profile is available. User can create multiple profiles. Once, the profiles are configured, the profiles become available on the WAN Profiles page. They can associate the WAN profile with Access Networks.
-
To create a WAN Profile, click + Profile. The Profile Name field becomes available under the Create Internet (WAN) Profile section. To enter data in the respective fields, see table below.
|
Fields |
Description |
|
Profile Name |
Enter the name of the profile. |
|
Fall-Through Mode |
Fall-Through Mode controls traffic behavior when traffic cannot be routed through the configured Hub.
|
|
Disabled WANs |
Disabled WAN sources are displayed. |
|
Set Priority of Enabled WANs |
|
|
Highest Priority |
To assign WAN links/Interfaces to a priority level, perform the following steps. Note: Only Interfaces enabled on the Interfaces tab will be visible on the WAN Profile screen. Steps Drag and drop the WANs available from the Disabled WANs section to the respective priority section. More than one WAN (similar or dissimilar type) can be associated with a single priority. In this case, these WANs will be bonded.
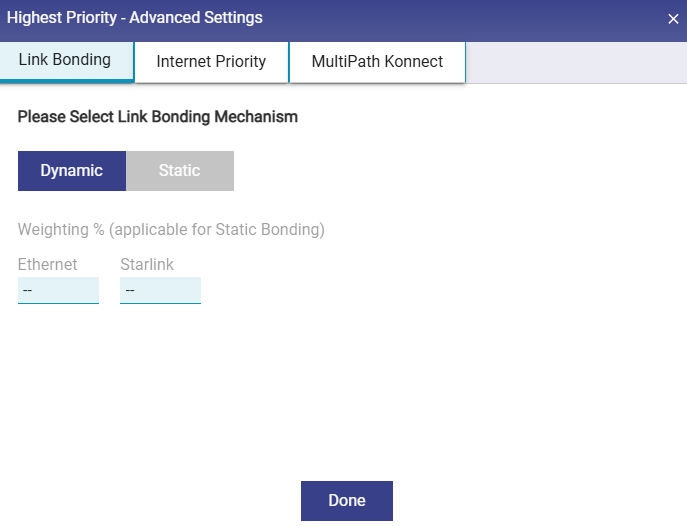
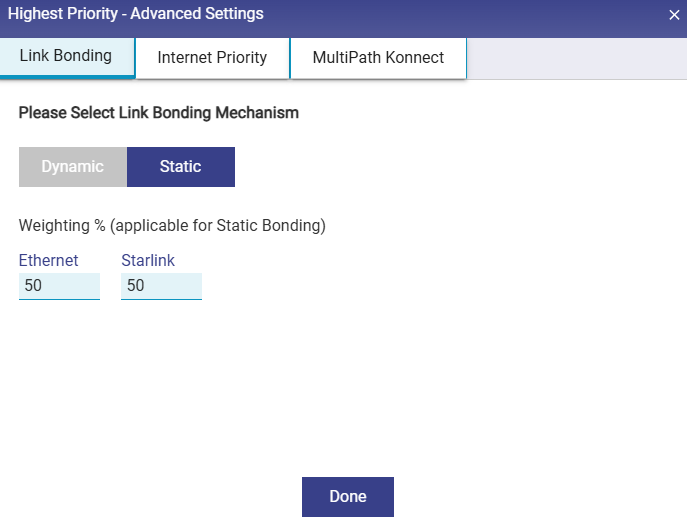
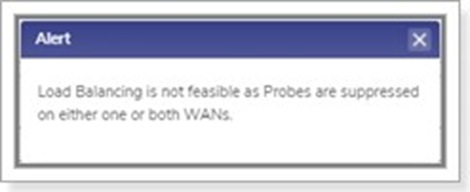
Note: Interfaces/WANs for which Probe Configuration Profile is set to Always Up or High Cost cannot be bonded with other Interfaces/WANs. Link Bonding can be set to Static or Dynamic. By default, the link bonding type is Dynamic, in which case the system distributes the traffic on each WAN link based on performance. In Static Setting, a configured % of traffic is set for each WAN link. For details of the types of link bonding, point to i icon next to the Link Bonding. The user can configure the weighting % of the WAN link.
To configure the weighting %, perform the following steps. Steps
|
|
Priority 2 |
Refer to Highest Priority |
|
Priority 3 |
Refer to Highest Priority |
|
Priority 4 |
Refer to Highest Priority |
|
Lowest Priority |
Refer to Highest Priority |
|
Hub Dropoff |
Hub Dropoff enables or disables routing traffic via a Hub on a per-WAN-interface basis. This setting prevents traffic from using a WAN that cannot reach the hub and ensures proper failover behavior. Hub Dropoff can be enabled/disabled per WAN or set of WANs. If the WANs are in bonded set (in same priority) and Hub Dropoff is enabled, then it is equivalent to Advance Bonding. |
|
Advanced Settings |
Click the gear icon for a WAN priority to open the Advanced Settings dialog. The dialog includes the existing Link Bonding and Internet Priority tabs, along with the newly introduced MultiPath Konnect (MPK) tab, which provides Gen4 advanced configuration options. |
|
Link Bonding |
Link Bonding allows multiple WAN links to be used together to distribute traffic, improving bandwidth utilization and overall network performance. Instead of sending all traffic through a single WAN, Link Bonding spreads traffic across selected WAN links based on the configured bonding mode. Link Bonding can be configured in Static or Dynamic mode.
Dynamic Link Bonding:
Recommended for most deployments where WAN conditions vary.
Static Link Bonding
|
|
Internet Priority (DL/UL MIR) |
Internet Priority allows you to define bandwidth limits per WAN link within an Internet (WAN) profile.
|
|
MultiPath Konnect |
When a WAN Priority operates in Tunnel Mode, the WAN Profile screen provides an additional Advanced Settings → MultiPath Konnect tab. This tab allows administrators to configure advanced MPK transport behavior for each WAN priority. |

Table WAN Profile
Once the WAN link is assigned to the priority levels, the server will verify the network based on the them. As an example, the user can set the following priority levels of enabled WANs for Owner Profile.
Highest Priority – Ethernet
Priority 2 – Cell1 and Cell2
Priority 3 – VSAT 1 and VSAT 2
Initially, the server will verify whether the Ethernet network is available as the Ethernet is assigned the highest priority. If the Ethernet network is available, then the internet connection will be established through this network. Otherwise, the server will verify whether the Cellular network is available as the Cellular networks are assigned the priority 2 level. The process will continue up to the priority level configured.
The server will distribute the traffic based on the weighting % configured for the WAN links.
-
Click Save.
WAN profile is configured successfully and visible on the table listing on the left. The WAN profile will become available while configuring the networks, see figure below.
Please note that if a WAN profile is assigned for the System Route, then Hub Dropoff / Fallthrough Mode and Internet Priority fields are ignored.
Multi Path Konnect
TCP Transport
-
Routes MPK tunnel traffic over TCP instead of UDP.
-
This option is useful on networks where UDP traffic is blocked or restricted.
Selection Rules
When TCP Transport is enabled:
-
Forward Error Correction (FEC)
-
Packet Balancing
-
Packet Duplication
are automatically unavailable because these features cannot operate together.
Likewise, if any of the above options are already enabled, TCP Transport cannot be selected until they are disabled.
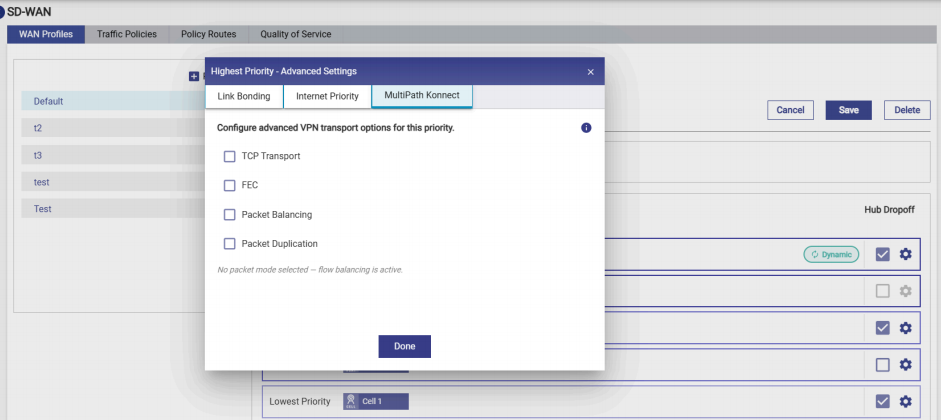
Forward Error Correction (FEC)
FEC improves communication across unreliable links by sending redundant packets, allowing lost packets to be reconstructed without retransmission.
Available levels include:
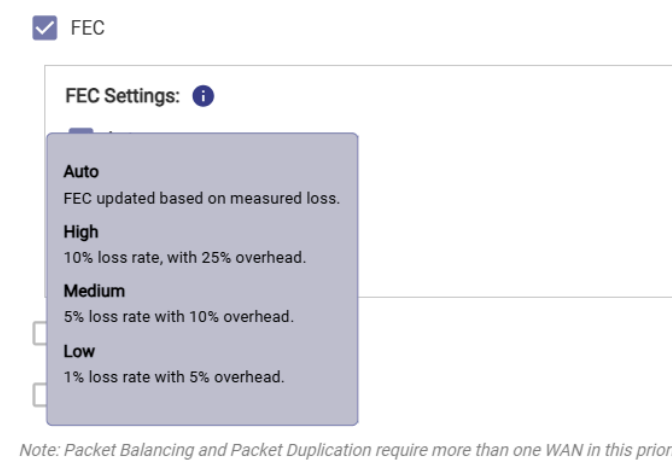
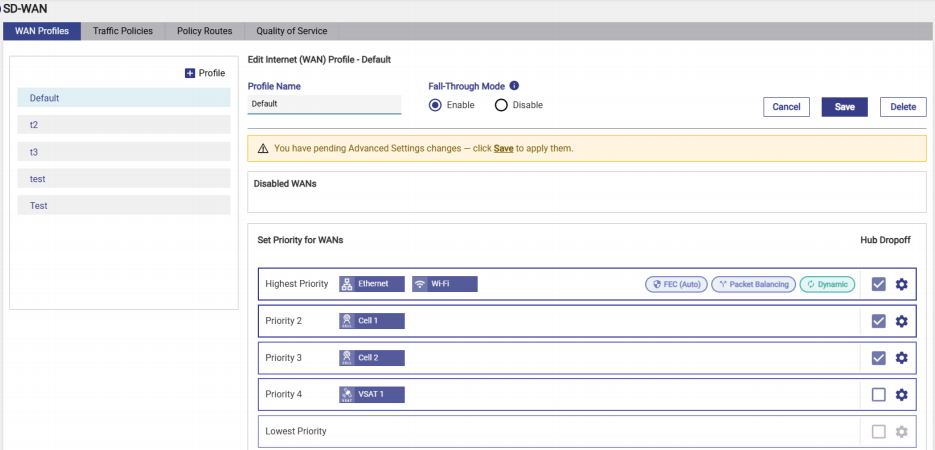
When enabled, the selected FEC level is displayed as a badge beside the WAN Priority on the WAN Profile screen.
Packet Balancing
Packet Balancing distributes packets across multiple WAN interfaces within the same priority.
Benefits include:
-
Higher aggregate bandwidth
-
Improved throughput across multiple active WAN links
Requirements
Packet Balancing is available only when more than one WAN interface is assigned to the selected WAN priority.
Packet Duplication
Packet Duplication transmits identical packets across every WAN link within the same priority.
Benefits include:
-
Increased reliability
-
Reduced impact of packet loss
-
Improved resiliency during WAN degradation
Requirements
Packet Duplication is available only when more than one WAN interface is assigned to the selected WAN priority.
Feature Selection Rules
The Multi Path Konnect Advanced Settings enforce the following validation rules:
TCP Transport
-
Cannot be enabled if FEC, Packet Balancing, or Packet Duplication is already selected.
-
Selecting TCP Transport automatically disables all other MPK transport options.
Forward Error Correction
May be enabled independently but cannot coexist with TCP Transport.
Packet Balancing and Packet Duplication
-
Available only when the selected WAN priority contains multiple WAN interfaces.
-
These features are mutually exclusive.
-
Selecting Packet Balancing disables Packet Duplication.
-
Selecting Packet Duplication disables Packet Balancing.
-
Default Behavior
If none of the Advanced Settings are selected, MPK Tunnel uses its standard flow balancing mechanism for traffic distribution.
Fall-Through Mode
The WAN Profile includes a Fall-Through Mode setting. This determines how traffic is handled if the MPK Tunnel becomes unavailable.
|
Setting |
Behavior |
|---|---|
|
Enable |
Traffic automatically falls back to native WAN routing. |
|
Disable |
Traffic is dropped until the MPK Tunnel is restored. |
Visual Indicators
Once configured, the WAN Priority displays badges indicating the enabled MPK features, for
example:
-
FEC (Auto)
-
Packet Balancing
-
Packet Duplication
-
Dynamic Hub Dropoff
This provides administrators with an at-a-glance view of the MPK configuration applied to each WAN priority.
Hub Dropoff Behavior - Migration from EpicOS 8.0 to 8.1
In the EpicOS 8.0 version, Hub Dropoff was configured per Interface in the Interfaces screen. In the current EpicOS 8.1 version, Hub Dropoff is configured per Priority in the WAN Profiles screen as explained above. As a result, Hub Drop-Off is no longer evaluated per individual interface, but derived collectively from all interfaces belonging to the same priority.
During upgrade from 8.0 → 8.1, the system automatically determines the Hub Drop-Off setting for each priority based on:
-
Whether Advanced Bonding was enabled or disabled
-
The Hub Drop-Off state of interfaces under the same priority
This behavior is explained below with a few example scenarios.
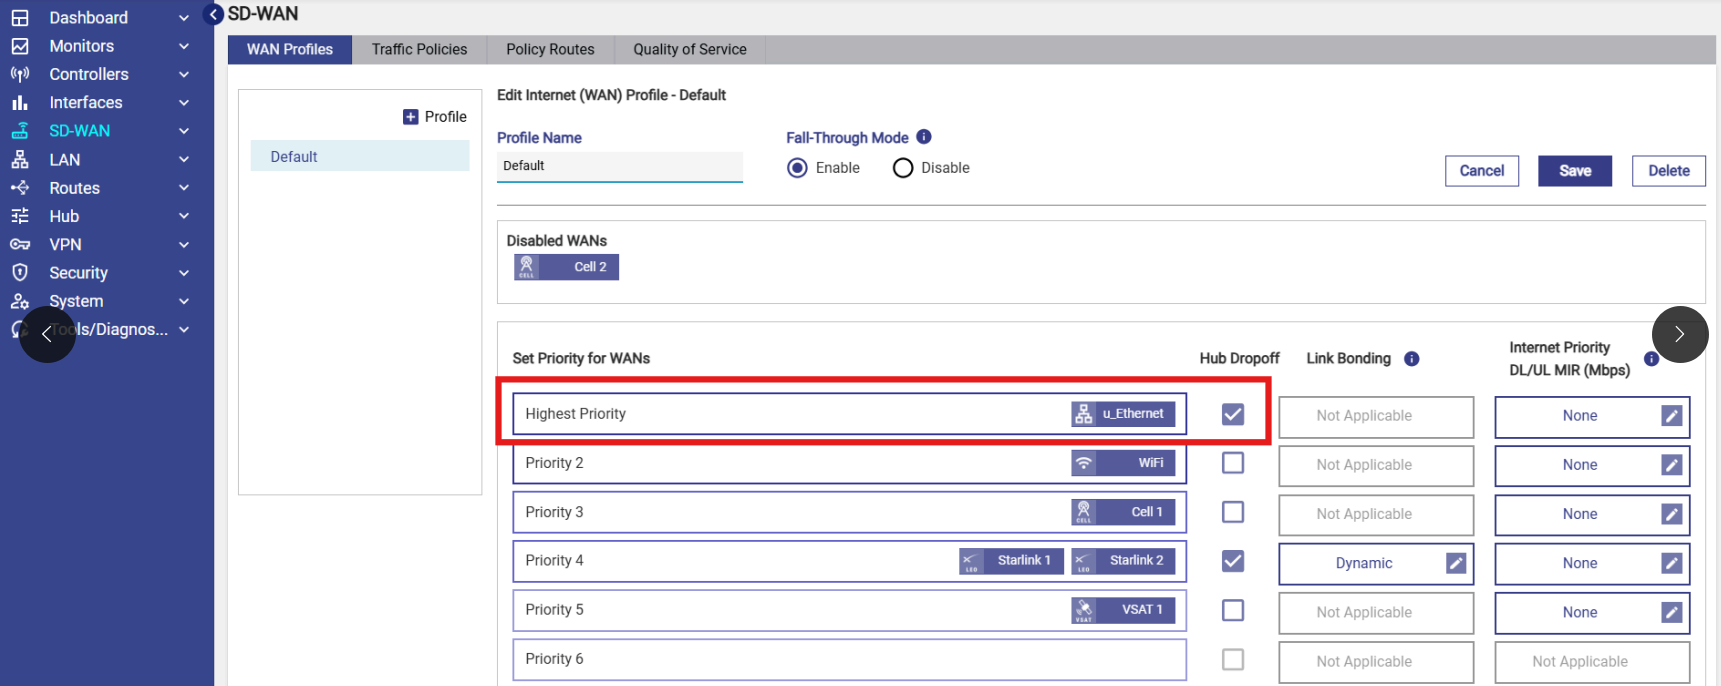
Scenario 1 - Single Interface, Advanced Bonding Enabled/Disabled:
Configuration in 8.0:
-
Advanced Bonding: It can be Enabled / Disabled.
-
Ethernet: Hub Dropoff Enabled
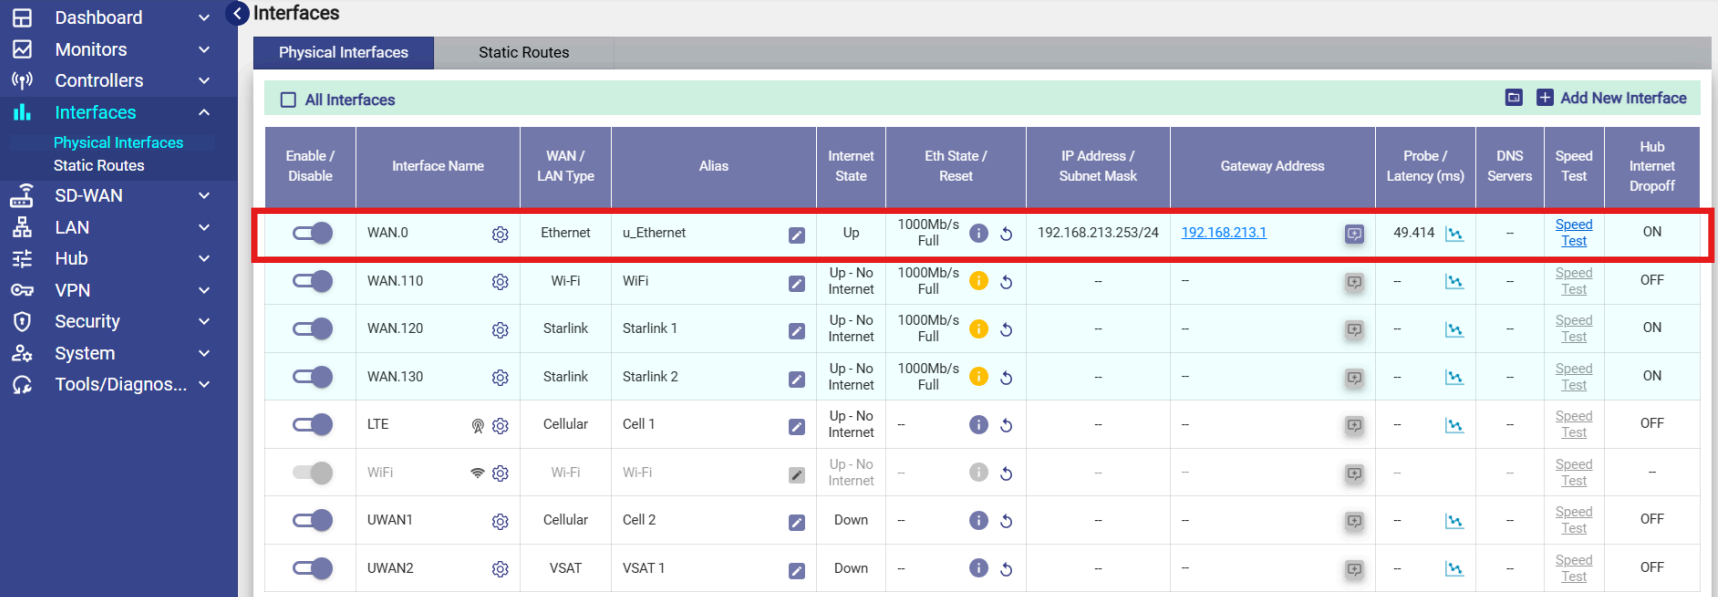
Expected result in 8.1:
Hub Dropoff will be Enabled (at priority level).
Explanation - When only one interface exists under a priority, the Hub Drop-Off configuration from 8.0 is directly migrated to the corresponding priority in 8.1, irrespective of whether Advanced Bonding is enabled or disabled.
Scenario 2 - Multiple Interfaces, Advanced Bonding Disabled (All WAN Links Enabled):
Configuration in 8.0:
-
Advanced Bonding: Disabled
-
Starlink 1: Hub Dropoff Enabled
-
Starlink 2: Hub Dropoff Enabled
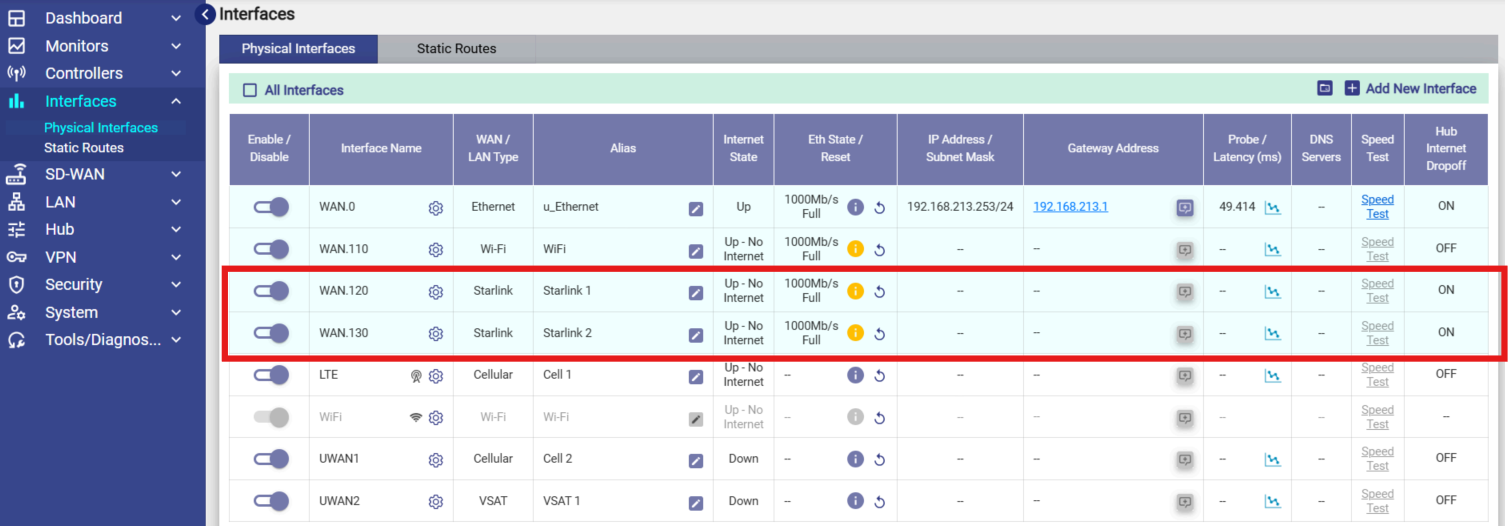
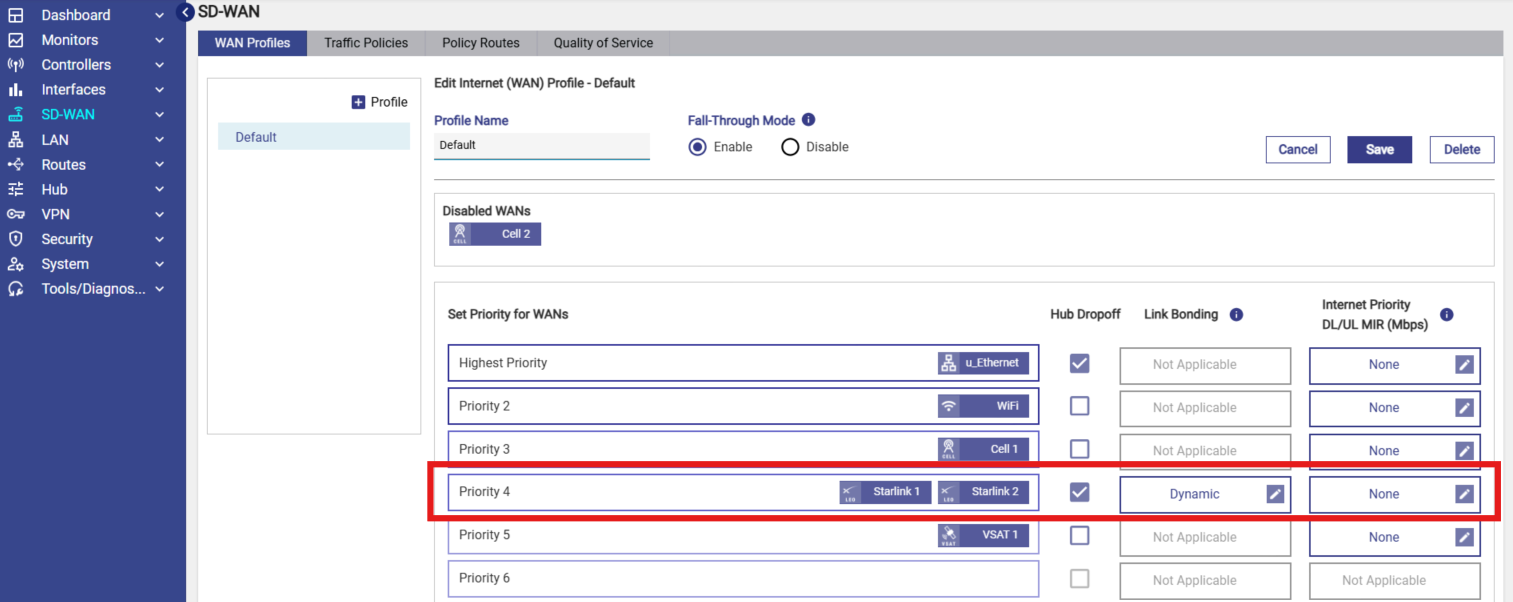
Expected result in 8.1:
Hub Dropoff will be Enabled (if both WANs belong to the same priority).
Explanation - When Advanced Bonding is disabled and all interfaces under a priority have Hub Drop-Off enabled, the priority-level Hub Drop-Off is enabled in 8.1.
Scenario 3 - Multiple Interfaces, Advanced Bonding Disabled (Mixed State):
Configuration in 8.0:
-
Advanced Bonding: Disabled
-
Starlink 1: Hub Dropoff Enabled
-
Starlink 2: Hub Dropoff Disabled
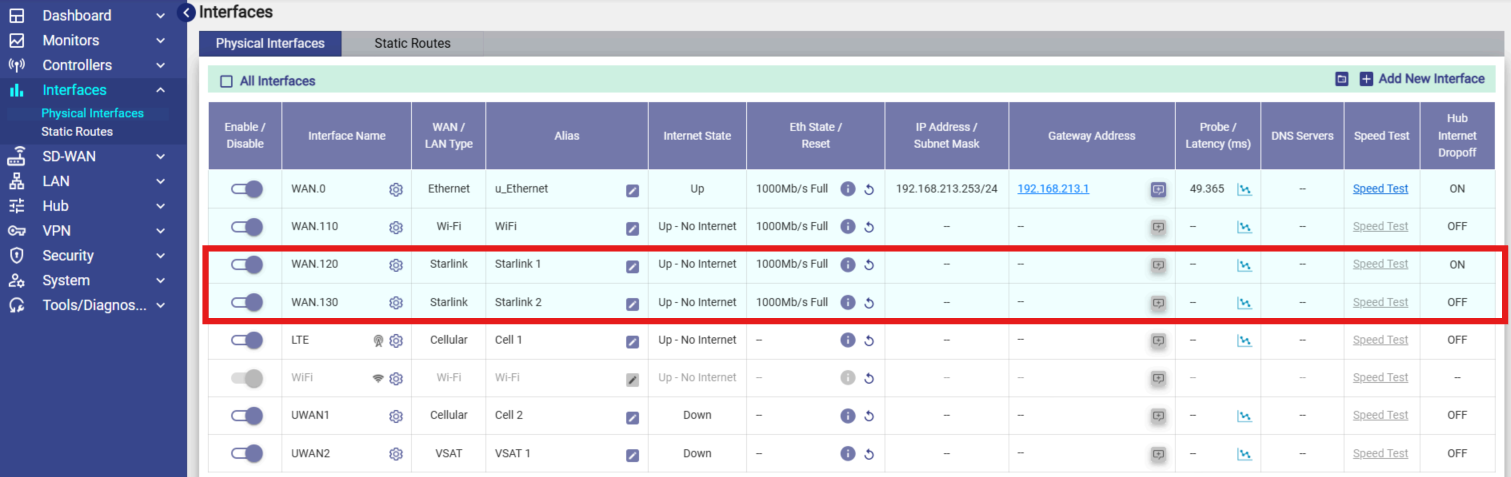
Expected result in 8.1:
Hub Drop-Off will be Enabled (if both WANs belong to the same priority)
Explanation - With Advanced Bonding disabled, if any one interface under the priority had Hub Drop-Off enabled in 8.0, Hub Drop-Off is enabled for the entire priority in 8.1.
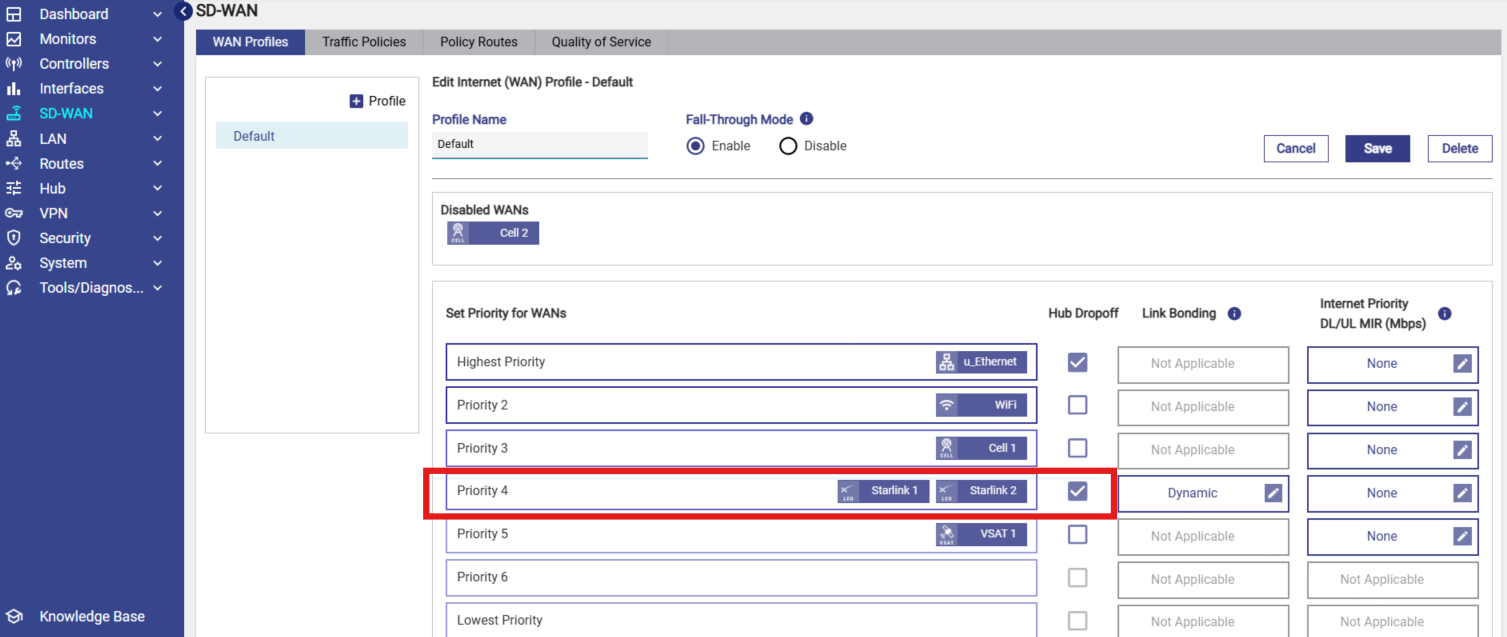
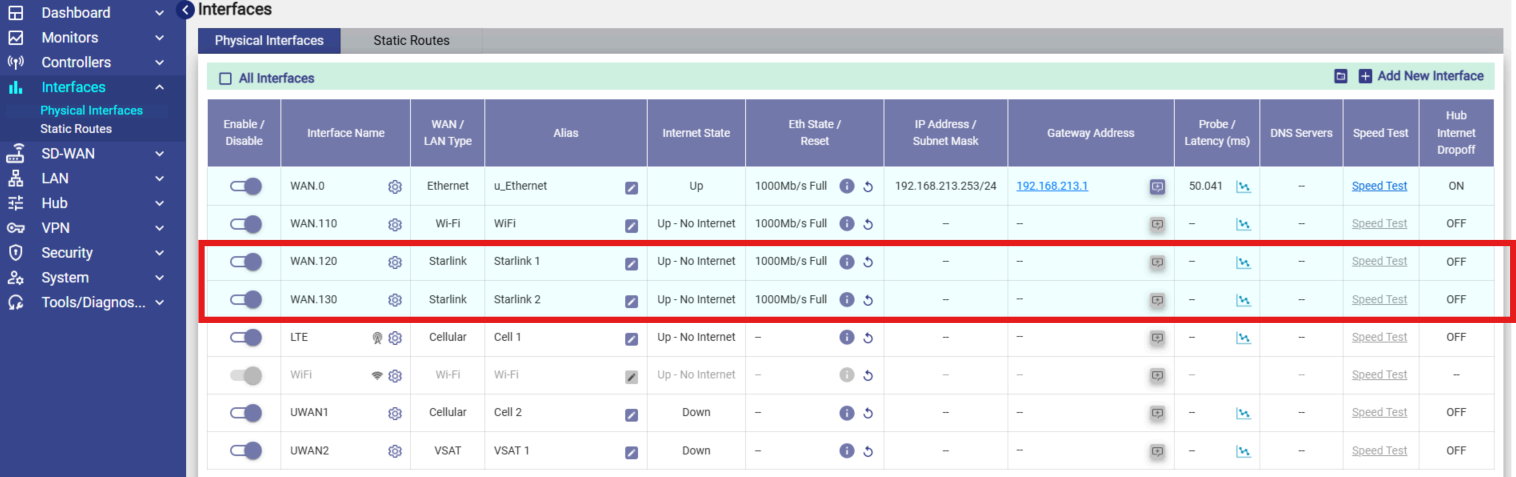
Scenario 4 - Multiple Interfaces, Advanced Bonding Enabled (All WAN Links Disabled):
Configuration in 8.0:
-
Advanced Bonding: Enabled
-
Starlink 1: Hub Dropoff Disabled
-
Starlink 2: Hub Dropoff Disabled
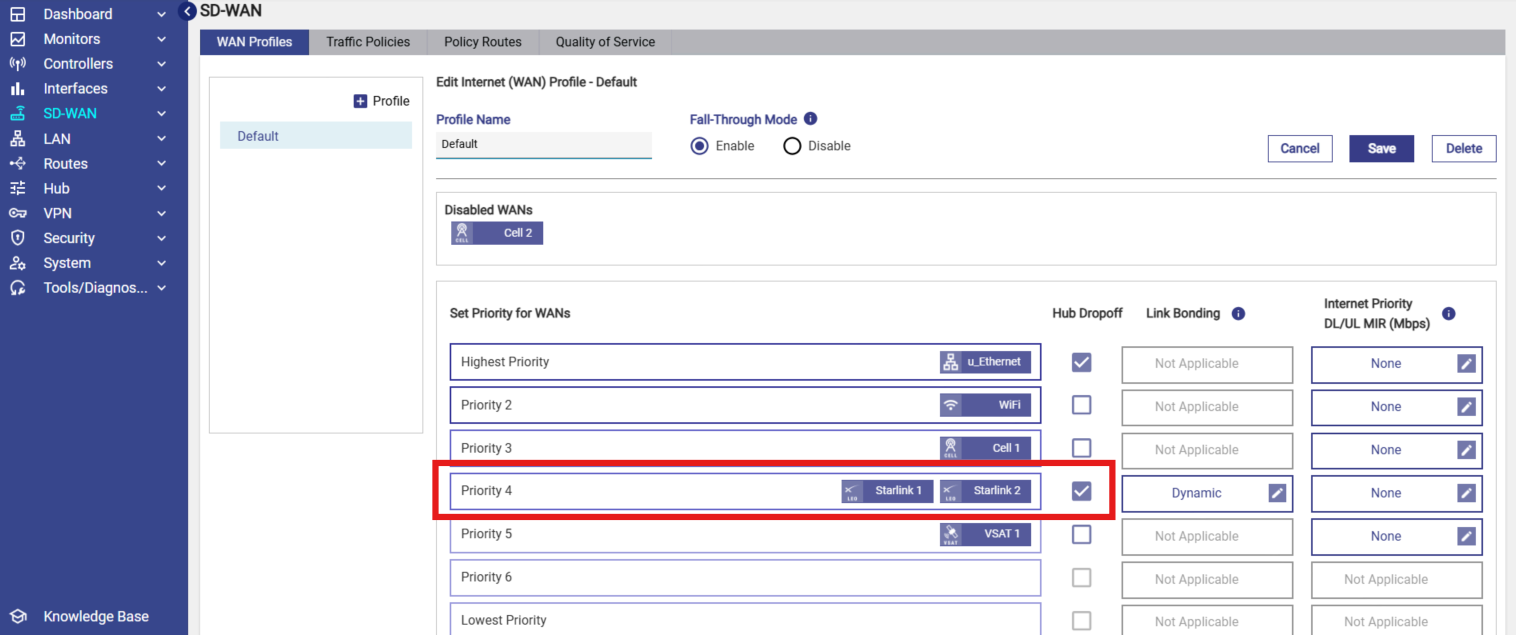
Expected result in 8.1:
Hub Dropoff will be Enabled.
Explanation - When Advanced Bonding is enabled, traffic can dynamically shift between multiple links within the same priority. To maintain routing consistency and avoid asymmetric routing in the priority-based model of 8.1, Hub Drop-Off is automatically enabled at the priority level whenever:
-
More than one interface exists under the same priority
Key Takeaways
-
Hub Drop-Off configuration has moved from per interface (8.0) to per priority in the WAN Profile (8.1).
-
After upgrade, Hub Drop-Off is always configured and visible in the WAN Profile.
-
With Advanced Bonding enabled, Hub Drop-Off is automatically enabled for a priority when multiple interfaces exist under that priority.
-
With Advanced Bonding disabled, Hub Drop-Off follows an “any interface enabled → priority enabled” rule.
-
For single-interface priorities, the enabled/disabled state from 8.0 is retained, but the setting is now managed from the WAN Profile screen in 8.1.
Editing a WAN Profile
To edit a WAN profile, perform the following steps.
Steps
-
Click on the WAN Profile to be edited.
-
The WAN Profile appears on the right section.
-
The user can edit the profile name or WAN priorities.
-
Click Save to profile.
-
The WAN Profile is successfully saved.
Deleting a WAN Profile
To delete a WAN profile, perform the following steps.
Steps
-
Click on the WAN Profile to be deleted.
-
Click Delete button on top right or bottom.
-
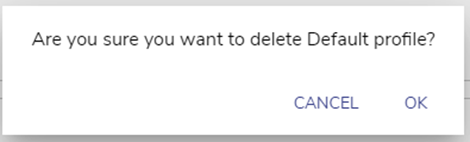
Click OK to confirm the deletion operation.
-
The WAN Profile will be deleted from the system.