
Overview
Dynamic DNS (DDNS) keeps a fixed hostname (for example, camera.edge.com) pointing to the current public IP address of the Edge or Hub, even when that IP address changes. EpicOS publishes the IP address to your DDNS provider automatically at a regular interval, so users and remote sites can always reach the device by name instead of by IP address.
Common uses:
-
Remote access to services behind the Edge – reach services such as VPN, CCTV cameras or web servers using a fixed hostname when the WAN receives a dynamic public IP (for example, from Starlink or a DHCP-based ISP link).
-
Reaching a Hub by FQDN – Edges can connect to a Hub using a fixed Fully Qualified Domain Name (FQDN), removing the need for a static public IP on the Hub. Hub Internet Drop-off (POP IP) configurations also accept FQDNs instead of static IP addresses.
Before You Begin
-
Create an account with a supported DDNS provider (Cloudflare, No-IP or Dynu) or with any other provider that supports the dyndns2 update protocol.
-
Create each hostname you want to publish in your DDNS provider's portal first. If the hostname does not exist with the provider, the update is rejected.
-
Keep the provider's username (or API user) and password (or API key) ready.
-
Make sure the WAN interface or WAN profile you will publish has a public IP address. Some providers (for example, No-IP) reject updates that carry a private/LAN IP address such as 192.168.x.x. Use the IP Address option (described below) if the WAN uses a private IP behind a DMZ.
Navigating to Dynamic DNS
Go to Interfaces > Dynamic DNS.
The Dynamic DNS screen has three areas:
-
Select Dynamic DNS Settings – turns the DDNS feature on or off for the device.
-
Dynamic DNS Configuration – global settings for the DDNS provider, used by all records.
-
Dynamic DNS Records – one record for each hostname to be published.
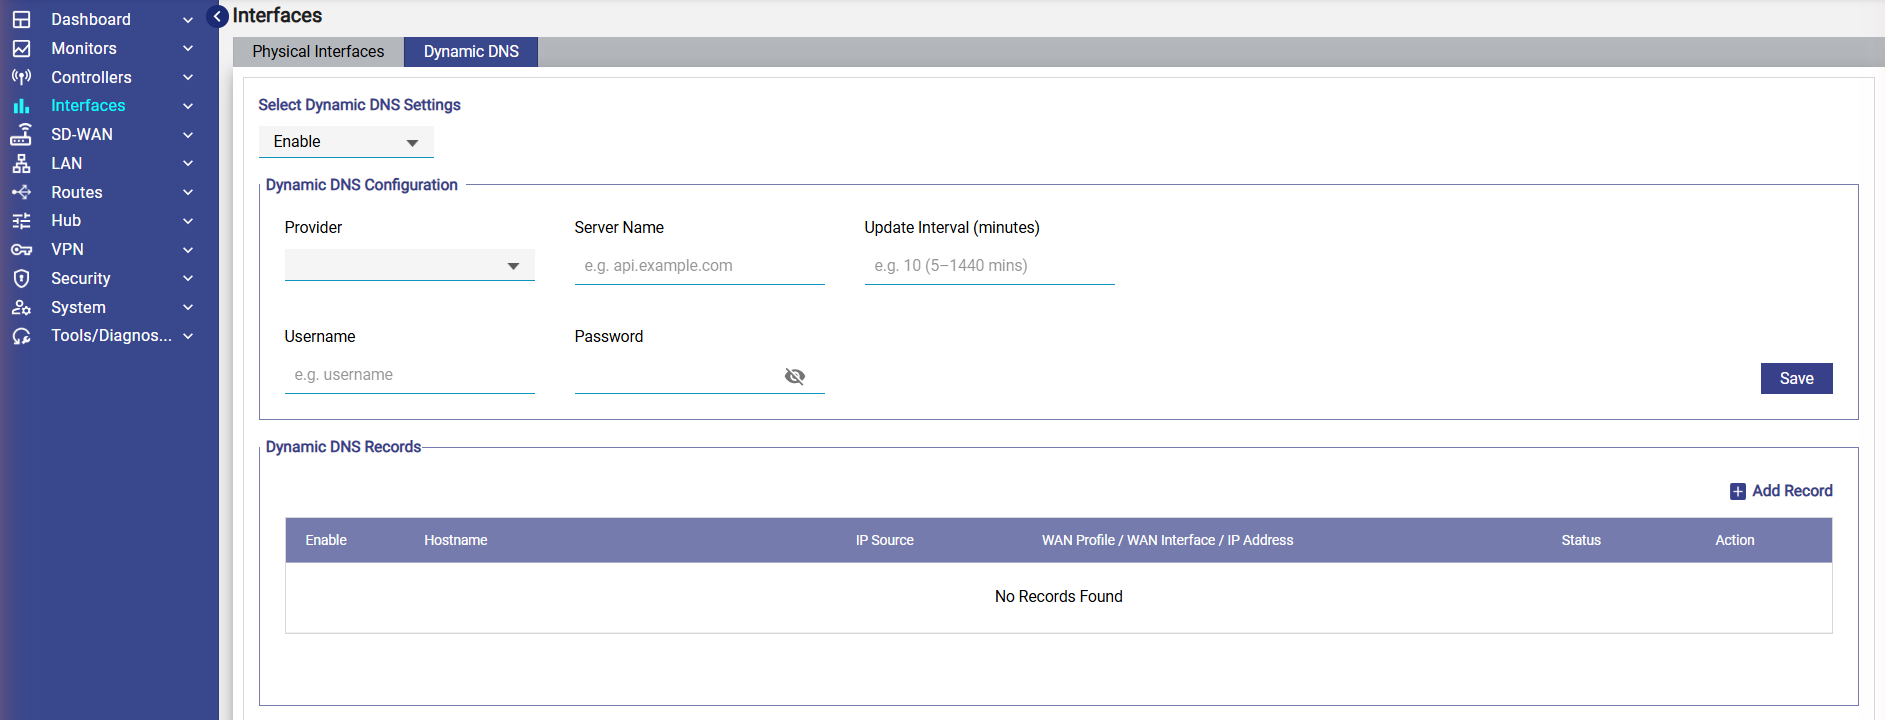
Select Dynamic DNS Settings
|
Field |
Description |
|---|---|
|
Select Dynamic DNS Settings |
Select Enable to turn on the DDNS feature for the device, or Disable to turn it off. When disabled, no DDNS updates are sent for any record. |
Dynamic DNS Configuration
These global settings define which DDNS provider is used and how EpicOS authenticates with it. They apply to all Dynamic DNS records.
|
Field |
Description |
|---|---|
|
Provider |
The DDNS service provider used by your organization. Options: Cloudflare, NoIP, dynu and Other. Select Other for any provider that is not listed. |
|
Server Name |
The update server (API endpoint) of the DDNS provider. When a built-in provider is selected, this field is populated automatically (Cloudflare: |
|
Update Interval (minutes) |
How often EpicOS publishes the current IP address to the DDNS provider. Range: 5–1440 minutes. Default: 10 minutes. |
|
Username |
The username used to authenticate with the DDNS provider. |
|
Password |
The password or API key used to authenticate with the DDNS provider. Click the eye icon to show or hide the value. |
|
Save |
Saves the global Dynamic DNS configuration. |
Dynamic DNS Records
Each record maps one hostname to an IP address. Create one record for each service or device you want to publish through DDNS (for example, camera.edge.com for a camera service, or hub1.example.com for a Hub).
|
Column |
Description |
|---|---|
|
Enable |
Toggle to enable or disable DDNS updates for this record without deleting it. |
|
Hostname |
The fully qualified hostname to publish, for example |
|
IP Source |
How the IP address for this hostname is determined: WAN Profile, WAN Interface or IP Address. See IP Source Options below. |
|
WAN Profile / WAN Interface / IP Address |
Depends on the selected IP Source: select the WAN profile (for example, Bonded), select the WAN interface (for example, Comcast), or enter a static IP address. |
|
Status |
The update status of the record. |
|
Action |
While adding or editing a record: click the tick icon to save the record or the X icon to cancel. For saved records: click the pencil icon to edit or the trash icon to delete. |
IP Source Options
|
IP Source |
When to use |
What is published |
|---|---|---|
|
WAN Profile |
The service is associated with a WAN profile that uses priority-based links (for example, a Hub or Edge with primary and backup WAN links). |
The IP address of the active link through which traffic is currently flowing in the selected WAN profile. When the WAN profile fails over to another link, the hostname is updated to that link's IP address. |
|
WAN Interface |
The WAN interface receives its IP address via DHCP and the IP may change (for example, a WAN that receives a public IP from the Starlink network). |
The current IP address assigned to the selected WAN interface, updated dynamically whenever it changes. |
|
IP Address |
The public IP address is fixed, or the WAN uses a private IP address in a DMZ network and an external public IP must be advertised. |
The static IP address you enter in the record. |
How to Set Up Dynamic DNS
Step 1: Enable Dynamic DNS and configure the provider
-
Go to Interfaces > Dynamic DNS.
-
In Select Dynamic DNS Settings, select Enable.
-
Under Dynamic DNS Configuration, select the Provider. The Server Name is filled in automatically. If you select Other, enter the provider's server name.
-
Enter the Update Interval in minutes (5–1440), or keep the default of 10 minutes.
-
Enter the provider Username and Password.
-
Click Save.
Step 2: Add a Dynamic DNS record
-
Under Dynamic DNS Records, click Add Record. A new row is added to the table.

-
Make sure the Enable toggle is on.
-
Enter the Hostname (for example,
camera.edge.com). -
Select the IP Source: WAN Profile, WAN Interface or IP Address.
-
Select the WAN profile or WAN interface, or enter the IP address, in the WAN Profile / WAN Interface / IP Address column.
-
Click the tick icon in the Action column to save the record.
Repeat Step 2 for each hostname you want to publish.
Step 3: Verify
-
Check the record's Status column on the Dynamic DNS screen.
-
Sign in to your DDNS provider's portal and confirm that the hostname now points to the expected IP address.
-
Optionally, resolve the hostname from an external network (for example,
nslookup camera.edge.com) and confirm that it returns the device's public IP address.
Managing Records
-
Edit a record – click the pencil icon, change the fields, then click the tick icon to save.
-
Pause updates for a record – turn off the record's Enable toggle. The record is kept but no updates are sent for it.
-
Delete a record – click the trash icon. EpicOS stops updating that hostname; the hostname itself remains in your provider account.
-
Turn off DDNS for the device – in Select Dynamic DNS Settings, select Disable.
Example Scenarios
Example 1: Remote access to a camera on a Starlink WAN
The Edge's Starlink WAN receives a public IP through DHCP that changes from time to time. To reach the onboard camera service at a fixed name:
-
Configure the provider under Dynamic DNS Configuration and click Save.
-
Add a record with Hostname
camera.edge.com, IP Source WAN Interface, and select the Starlink WAN interface. -
Save the record. Remote users can now reach the camera service using
camera.edge.com(an Inbound NAT / port forwarding rule is still required to forward the traffic to the camera).
Example 2: Hub reachable through the active link of a prioritized WAN profile
A Hub has a primary and a backup WAN link in a priority-based WAN profile. Edges should always connect to the Hub using one name:
-
Add a record with Hostname
hub1.example.com, IP Source WAN Profile, and select the Hub's WAN profile. -
When the WAN profile fails over to the backup link, the hostname is updated to the backup link's IP address.
-
On the Edges, use
hub1.example.comas the Hub address instead of a static IP address.
Example 3: Device in a DMZ network
The WAN interface is configured with a private IP address behind an upstream firewall that owns the public IP address. Add a record with IP Source IP Address and enter the external public IP address so that the hostname resolves to the address reachable from the internet.
Notes and Troubleshooting
-
Update rejected for an unknown hostname – the hostname must first be created in your DDNS provider account. Check that the hostname in the record matches exactly.
-
Authentication errors – re-check the Username, Password and Server Name. For Other providers, make sure the server name is the provider's dyndns2 update endpoint.
-
Private IP address rejected – some providers do not accept private/LAN IP addresses. Publish a public IP using a WAN interface with a public IP, or use the IP Address option with the external public IP.
-
Hostname not updated immediately – updates are published according to the Update Interval, and DNS caching may delay the change. Lower the Update Interval if faster updates are needed.
-
Multiple IP addresses per interface – only one IP address per WAN interface is currently published.