In the Interfaces screen, the user can view and update the configuration of the Interfaces present on the EpicOS System.
Viewing Configured Interfaces Details
To view details of the Interfaces pre-configured on the EpicOS System, do the following steps.
There is a flexibility that any ethernet interface on the EpicOS System (applicable for all products) can be configured as either WAN interface, LAN interface or for VSAT management. Along with this flexibility, VLANs can be configured on the interfaces and the same can be configured as WAN sub-interface or as LAN access port.
Interfaces are physically labelled on the hardware device as WAN or LAN, but can be configured as either a WAN or LAN port depending on the needed function
-
Login into the EpicOS Portal.
-
Select the Interfaces option from the side menu bar.
-
The Physical Interfaces tab is selected by default.
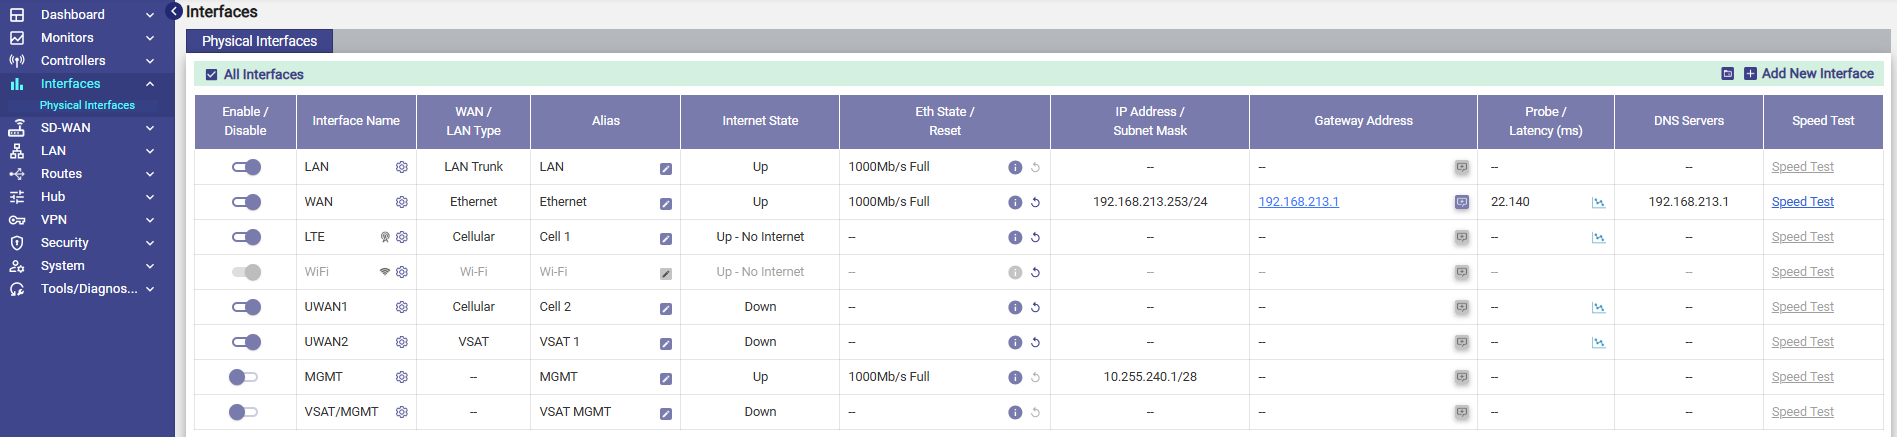
Details of the Interfaces present on the EpicOS System are listed on the Interfaces Screen.
Note: By Default, only enabled Interface are shown. To see all the interfaces, click the All Interfaces checkbox on the top. When checked All Interfaces, the user will be able to see all the Interfaces.
The user can also press on the Refresh button to refresh the page and get the latest data. By default, this screen refreshes every 30 seconds.
The user can upload configuration from available backup by clicking on Folder icon.
There are three types of Interfaces i.e., WAN, LAN and VSAT Mgmt. If the Status of an Interface is Up, then the various details such as State of the link, IP address or Subnet Mask populate on the Interfaces Screen. For details of attributes of each row, See tables below.
The Interfaces Table shows each configured interface in the EpicOS system and provides various readback data and settings to control the behavior. The following sections provides a brief description of each Field and an explanation of how to configure the available settings.
|
Fields |
Description |
Configuration |
|
Enable/Disable Toggle
|
This slider allows the user to enable or disable this network interface. User can modify an interface only when it is in the disabled state. Disabled Interfaces will only be shown if ‘All Interfaces’ checkbox is selected. |
Click/Slide to left to Disable. Click/Slide to right to Enable. |
|
Interface Name |
This indicates the network interface that is available on the site, along with some pre-configuration. User can edit the network interface by disabling it and then clicking on the ‘gear’ icon. |
To edit the interface, perform the following steps. Steps
In this dialog, they can modify: The Interface Type: WAN, LAN or VSAT Mgmt. |
|
WAN/LAN Type |
This field shows the type of the interface. |
If the Interface type is. WAN, then this field can be one of:
If Interface Type is ‘LAN’, then, this field can be one of: LAN Trunk LAN Access.
|
|
Alias |
User can give an alias name to the entire Interface. |
To configure the alias name, perform the following steps. Steps
|
|
Internet State |
This indicates the status of the Interface. Following are the statuses of the Interface.
|
N/A |
|
Eth State/Reset |
This indicates the maximum capacity of the respective Ethernet cable connected to the server. |
To view the Eth state details, hover on Info icon. This shows the Eth state details. State Change Count indicates the number of times the Internet State of the Interface changed since the last reboot. Refer Figure Eth State Hover. |
|
The info icon is blue when the Internet State is consistent for last 15 minutes and amber i when Internet State changes in last 15 minutes. (Down to UP or UP to Down). |
||
|
To reset Interface: Click on the reset icon This bounces the Interface if it is a physical interface. If it is a sub interface, it restarts the DHCP client. |
Eth State Details

|
Field |
Description |
Configuration |
|
IP Address / Subnet Mask |
This indicates the address of the network, host or device address, and subnet number. |
N/A |
|
Gateway Address |
This indicates that the internet modems and switches on the VLANs can be reached through the gateway address. The hardware is provided by the respective companies or vendors. The boxes connect to the network of the companies or vendors to establish internet connectivity on the site. |
If WAN Type is CELL, then. To access the Cellular modem to procure details and services (data consumed by the Interface and signal strength etc.) offered by the respective company or vendor, click the IP address link. User will be routed to the URL of the company. |
|
If WAN Type is VSAT, then.
Note: By default, No is selected. This indicates that the VSAT is not provisioned by K4. In the VSAT Type list, select one of the available options.
Note: SES and Hispasat are running two different iDirect platform firmware, hence the need for two modems.
Note: SES and Intelsat configurations are saved in the EpicOS System, and appropriate configuration is loaded on the modem.
|
|
|
|
VSAT LEO (Starlink) service and support |
If WAN Type is VSAT-LEO, then
If the VSAT-LEO modem is managed by K4, then click Yes. Then Management IP field is editable.
By default, NO is selected. This indicates that the VSAT-LEO is not managed by K4. Click on Yes and enter the Management IP of the VSAT LEO Management Interface. |
|
|
If the WAN modem is available, then the user can add the WAN modem to Konnect Remote Access. |
To add the WAN modem to the Konnect, perform the following steps. Steps
|
|
Probe/Latency (msec) |
Latency indicates the delay between the action and response in milliseconds.
Latency is available for the Interface whose status is Up. The user can configure the probe settings for the Interface. |
Each WAN type has a specific default probe setting. This is however configurable. To configure the probe settings, perform the following steps. Steps
To understand the various probing profile, hover on the i icon. See the below figure. 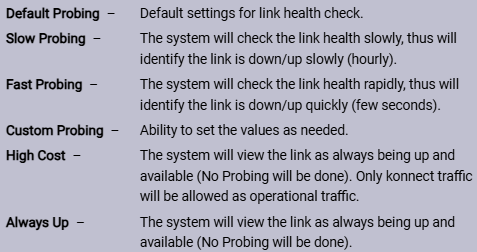
To disable the probes, select the Always Up profile of the profile. Disabling the Interface probe will expose the following threats.
Therefore, it is highly recommended not to disable the probe. However, the Interface can be disabled for high costs low priority links.
Configure the following probe settings in the Probe Settings field.
If the user selects the Default Probing, Slow Probing, and Fast Probing profile of the probe, then the probe frequency and link up and down values will become available. To define the probe frequency, the user must select the Custom Probing profile of the probe and enter the probe frequency within the range of 1 to 3600.
If the user selects the Default Probing, Slow Probing, and Fast Probing profile of the probe, then the probe frequency, link up down values will become available. Note: For VSAT FBB WAN type, the default Probe Profile is High Cost. To define the link up counter, the user must select the Custom Probing profile of the probe and enter the link up counts within range of 1 to 100.
If the user selects the Default Probing, Slow Probing, and Fast Probing profile of the probe, then the probe frequency and link up and down values will become available. To define the probe frequency, the user must select the Custom Probing profile of the probe and enter the link down counts within the range of 1 to 100.
|
|
|
User can view the Probe/Latency chart of the Interface. |
To view the Probe/Latency chart of the Interface, click Chart icon corresponding to the Interface. The Link Status section appears on the Performance Chart. |
|
DNS Servers |
This indicates the initial DNS used by the device to convert the name of the host to an IP address. However, a maximum of three DNSs’ can be configured. |
N/A |
|
Speed Test |
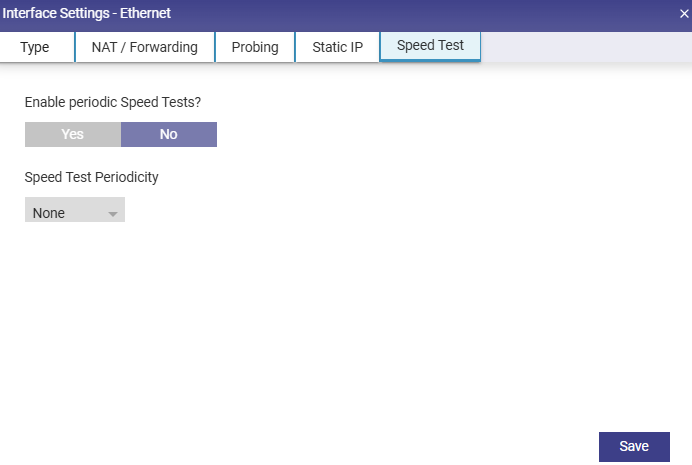
Run an instant Speed Test, or schedule automatic Speed Tests that run in the background to generate historic performance data. The user can measure the performance of a specific Interface in real-time or configure automated periodic speed test |
Click Speed Test. The Speed Test Results pop-up window appears. The speed test result includes the upload and download speed in Mbps and time stamp i.e., date and time when the speed test was performed. The speed test can be performed for the Interface whose state is Up. |
|
Default Speed Test settings per WAN type are:
To configure the periodic speed test, perform the following steps. Steps
To select a different periodicity value (other than default), Click the Speed Test Periodicity list, select the desired value.
|