
Configuring VoIP Services on EpicOS
EpicOS supports VoIP service, allowing SIP handsets to register locally through EpicOS and make inbound, outbound & local extension calls. The SIP service is based on the Asterisk server.
SIP Service Configuration
-
To configure VoIP, login to the EpicOS and select Controllers option from the side menu bar.
-
Select the VoIP tab.
-
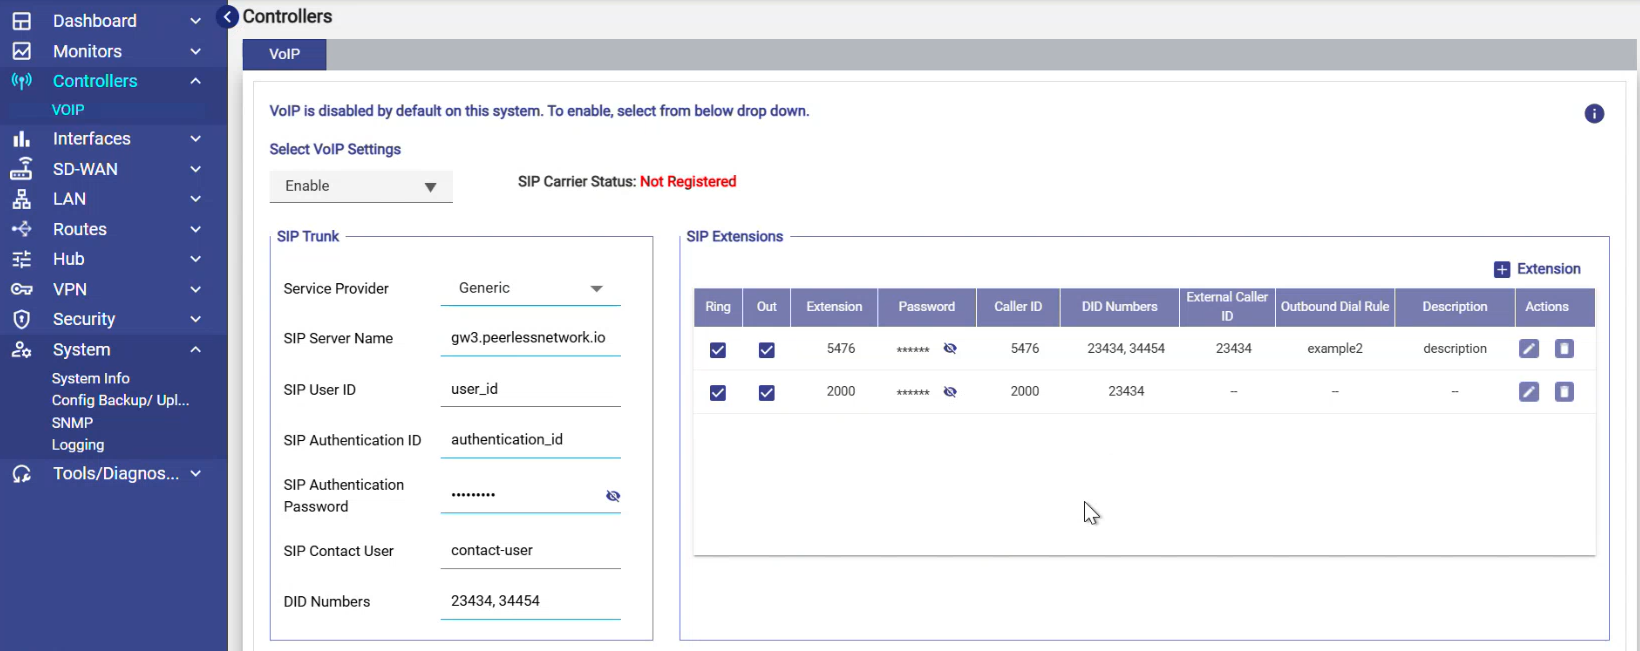
In the Select VoIP Settings field, select the Enable option from the dropdown menu. More fields will appear.
-
VoIP service (SIP PBX) can now be configured on this edge server.
-
There are three primary sections: SIP Trunk, SIP Extensions and CDR. The figure above has the fields configured; however a new system will be clear of information.
-
The SIP Trunk provider will provide the necessary information to utilize the SIP trunk, then from here the user can configure SIP extensions for local, inbound and outbound dialing.
-
If the user needs to debug, or analyze the call records, they can enable CDR using standard asterisk output to analyze calls.
-
The capabilities here align with the RedPort server however, note that this s ystem does support multiple DID with multiple DID assignments possible per extension. Details on the fields, and settings are below.
-
Once the user has finished configuring the system, click Save for these changes to be applied.
SIP Trunk
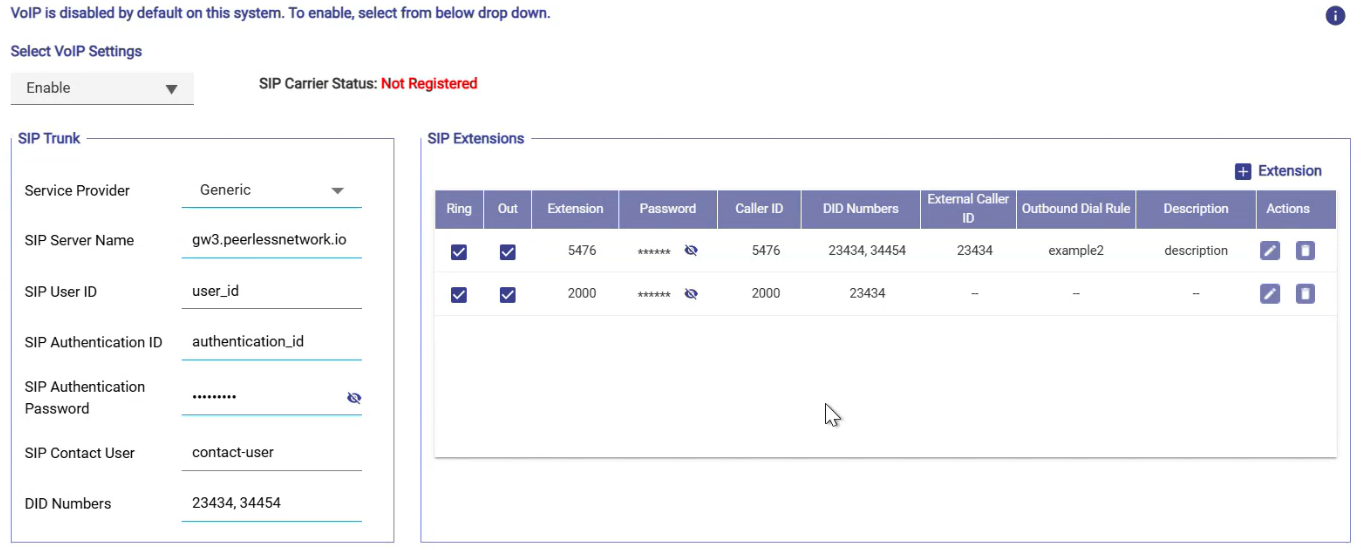
The information in this section must be obtained from your SIP trunk provider.
-
Service Provider - Service provider that will be used for SIP trunk registration and call routing. If the provider is not listed, select Generic and manually enter the SIP trunk configuration details.
-
SIP Server Name – The ‘Server’ or ‘Gateway’ name (or IP address)
-
SIP User ID – The username for the connection
-
SIP Authentication ID – The identity used for authentication and might be the same as the ‘User ID’
-
SIP Authentication Password – The password to be used
-
SIP Contact User - Specific providers that require a custom username passed inside the SIP Contact header. If left blank, it defaults to standard behavior.
-
DID Numbers – The telephone numbers assigned to the SIP trunk. If someone dials any of these numbers, the call will arrive at this edge server.
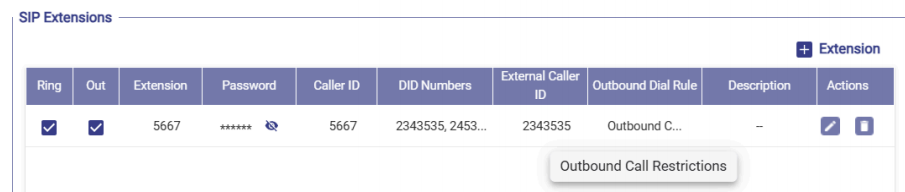
SIP Extensions
In this section, we configure telephone extensions for the EdgeServer PBX.
-
Click + Extension to add a new extension.
-
Click the ‘Pencil’ icon next to an entry to edit it.
-
The 'Trashcan’ icon next to an entry to delete it.
-
Check Ring if the user wants this extension to ring when one of the DID numbers (see above) is called. Extensions that don’t support inbound calls should not have a DID assigned, and thus will not Ring.
-
Check Out if the user wants outgoing calls for this extension.
-
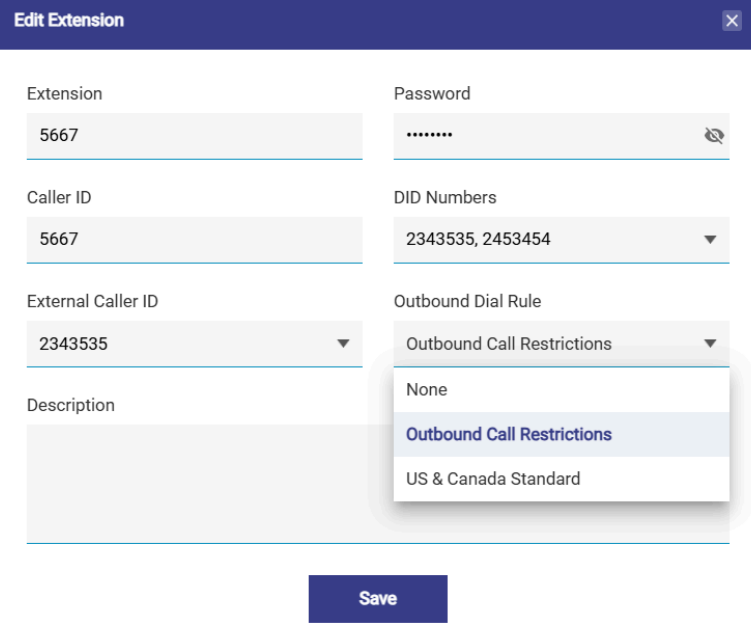
In the Extension field, specify the extension telephone number (2-4 digits in length – cannot start with 0 or 1).
-
In the Password field, specify a password that, along with the ‘extension’ number, will allow the configuration of SIP Phone using this extension.
-
In the Caller ID field, specify the caller-ID to be displayed when a call is made from this extension.
-
The DID numbers can be set from the DID Numbers field. Note that these numbers are set/provided by the prior SIP Trunk section.
-
The External Caller ID field allows you to select a single DID number to represent the outgoing external caller ID. This dropdown only displays the DID numbers currently assigned to that specific extension. If an assigned DID number is removed from the extension later, this field auto-clears.
-
Enter a Description for the extension.
-
Click Save to save the changes.
Outbound Dial Rules
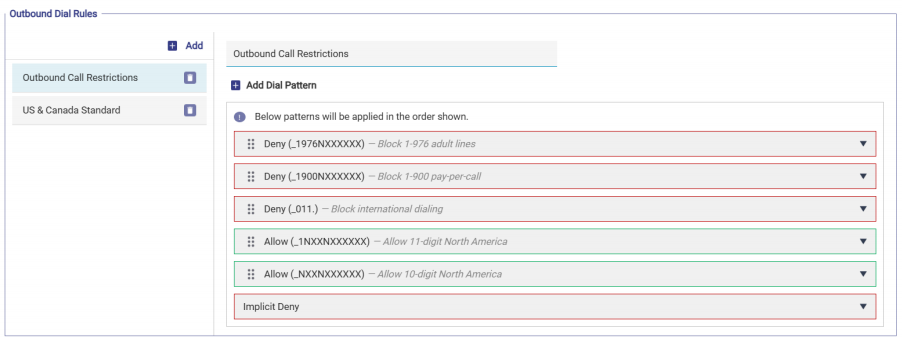
The Outbound Dial Rules section gives administrators granular control over outgoing call permissions per extension. Rules define which phone numbers an extension is permitted or restricted from dialing, using flexible wildcard dial patterns evaluated in order
-
Click + Add in the Outbound Dial Rules section, enter a unique Rule Name, and save it.
-
The new rule appears in the left panel list. Multiple rules can be created; each is independent.
-
Click any rule in the left panel to select it and configure its patterns in the right panel.
Adding Dial Patterns
-
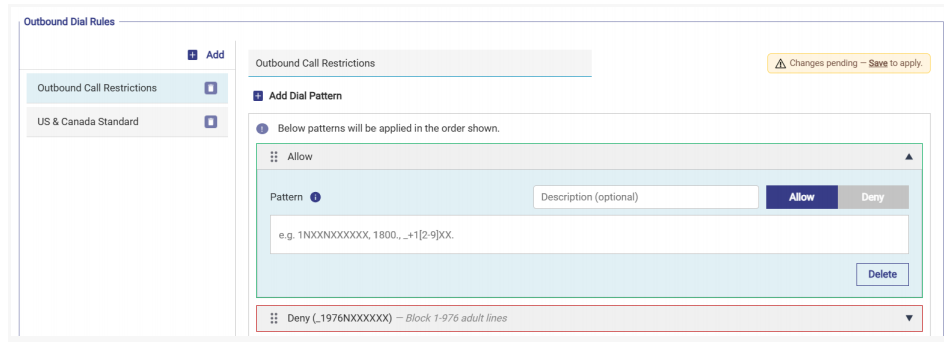
With a rule selected, click + Add Dial Pattern to add a new pattern entry. Each pattern is displayed as an expandable accordion card.
-
The collapsed card header shows:
-
A drag handle icon for reordering
-
A coloured left border — green for Allow, red for Deny
-
A summary: Allow (pattern) or Deny (pattern), followed by the description in italic if set
-
An expand / collapse arrow
-
Expanded Card Fields
-
Description (optional) — A free-text label to identify what the pattern represents.
-
Allow / Deny — Toggle buttons to set whether matching calls are permitted or blocked for this pattern
-
Pattern input — Enter the wildcard dial pattern this entry should match
-
Delete — Removes this pattern from the rule
Wildcard Pattern Syntax
All dial patterns use standard telephony wildcard notation, giving administrators flexible, expression-based number matching without listing every number individually. An info tooltip (ⓘ) next to the Pattern label inside each card provides a quick syntax reference without leaving the screen.
|
Character |
Meaning |
|---|---|
|
_ (prefix) |
Denotes the entry is a pattern |
|
|
Matches any digit 2 through 9 |
|
|
Matches any digit 1 through 9 |
|
|
Matches any digit 0 through 9 |
|
[range] |
Matches any digit within the specified range (e.g., [2-9] or [1-45-8]) |
|
. (dot) |
Matches one or more of any character |
|
! |
Matches zero or more of any character (immediate match) |
|
+ |
Literal plus sign, used for E.164 international format |
Example Patterns
|
Pattern |
Matches |
|---|---|
|
_011. |
All international calls starting with 011 |
|
_1NXX. |
US numbers — 1 + any valid area code + any number |
|
_+1[2-9]XX. |
E.164 format US numbers starting with +1 |
|
[1-45-8]! |
Any number starting with 1, 2, 3, 4, 5, 6, or 8 |
|
[range] |
Matches any digit within the specified range (e.g., [2-9] or [1-45-8]) |
|
. (dot) |
Matches one or more of any character |
|
! |
Matches zero or more of any character (immediate match) |
|
+ |
Literal plus sign, used for E.164 international format |
Implicit Allow / Deny
At the bottom of the pattern list for each rule sits the Implicit Allow / Deny card. This is the default action applied to any call that does not match any of the patterns listed above it.
-
The card border colour reflects the current default — green for Allow, red for Deny
-
Expand the card and use the Allow / Deny buttons to change the default
-
Info text inside the expanded card: "Applies to any call that does not match a dial pattern
above."
Assigning Rules to Extensions
When Outgoing Calls are enabled for an extension:
-
An Outbound Dial Rule dropdown becomes available in the extension dialog
-
Select the desired rule from the dropdown — the assigned rule name reflects in the main SIP Extensions table under the Outbound Dial Rule column
-
An extension with Outgoing Calls enabled must have an Outbound Dial Rule assigned before saving — an error is shown if this is missing
A rule that is assigned to one or more extensions cannot be deleted until it is unassigned. The error message will list the specific extension numbers the rule is assigned to.
Advanced Settings
The Advanced Settings section provides additional configuration options for VoIP settings. It provides finer control over how calls are processed and logged, optimizing the VoIP system for specific operational needs. It includes:
-
Call Settings
-
Codec Settings
-
CDR and Logs

Call Settings
-
Enter the Country Code - Defines the country dialing code (e.g., +1 for the U.S.).
-
Enter the International Dialing Prefix - Specifies the prefix used for international calls (e.g., 011).
-
Enter the National Dialing Prefix - Sets the prefix for national calls (e.g., 1 in the U.S.).
Codec Settings
-
Allows selection of audio codecs used for VoIP calls, such as μ-law, A-law, G.729, G.721, and G.722.
-
Ensures compatibility and quality of voice transmission based on network conditions and VoIP provider requirements.
CDR and Logs
-
If the user wants CDR records, enable the toggle button in the Generate CDR field.
-
If the user enabled CDR generation, they will get an option to download the CDR file. Up to 60 days worth of CDR-s can be present in the system. The CDR file (in CSV format) can be downloaded by clicking the Download Report icon.
-
Select the Enable Logging toggle button to turn on the system logging for troubleshooting and monitoring.