
Workflow Overview
-
This workflow describes how to configure Single Sign-On (SSO) using Azure as the Identity Provider in the EpicLink portal. The process involves a two-system setup. The configuration is completed by exchanging required values between the two systems in a structured sequence.
-
EpicLink (Service Provider / SP) – where SSO is enabled
-
Azure (Identity Provider / IdP) – where authentication is configured
-
-
Start SSO configuration in EpicLink by selecting Azure as the Identity Provider.
-
Copy the SP Entity ID and ACS URL from the SSO Settings screen. This will be used in the Azure Configuration.
-
Configure a SAML application in Azure using the copied SP details.
-
Complete the Azure setup and obtain IdP SSO URL, Entity ID, and Certificate.
-
Return to EpicLink and enter the retrieved IdP details.
-
Save and verify the configuration to enable SSO authentication.
The following sections provide a detailed, step-by-step explanation of how to configure SSO using Azure.
Step 1: Start in EpicLink - SSO Settings screen
-
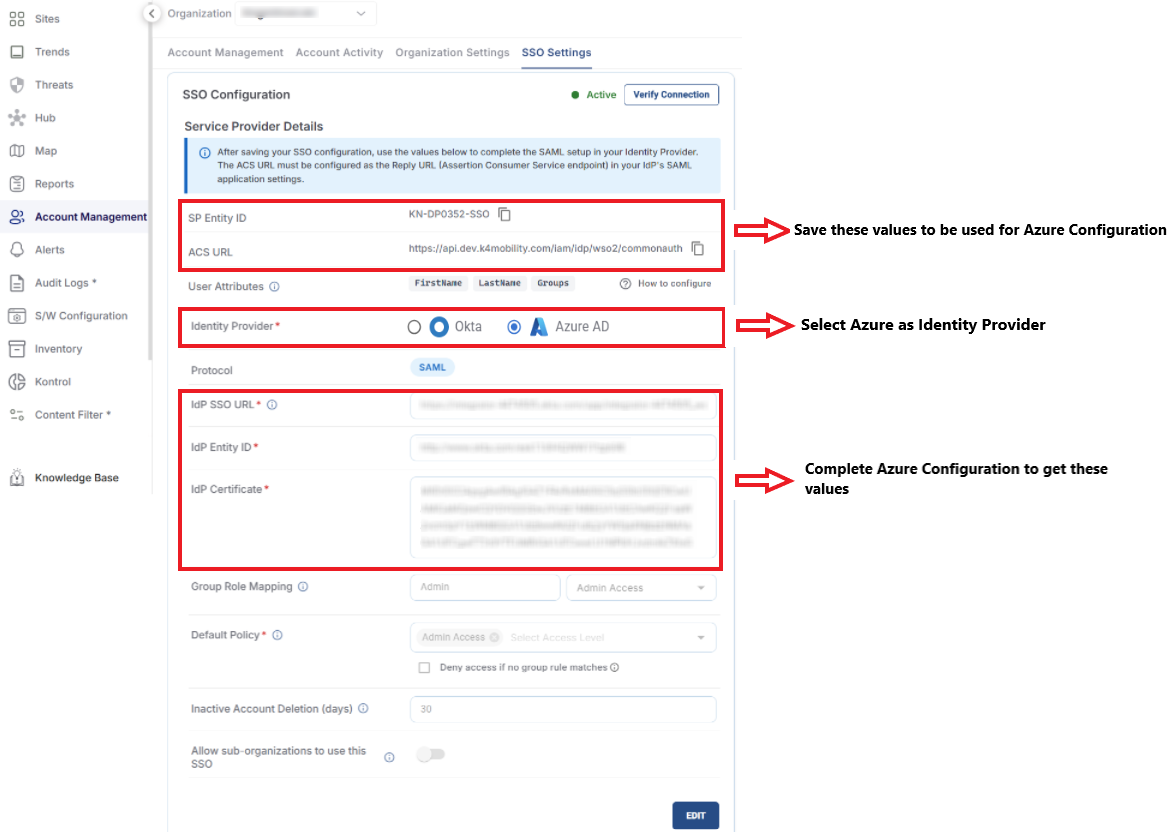
Navigate to Account Management → SSO Settings in EpicLink.
-
In the SSO Configuration section, select Azure as the Identity Provider.
-
The default Protocol is SAML.
-
Note the following values under Service Provider Details. These values will be used in the Azure Configuration.
-
SP Entity ID
-
ACS URL
-
-
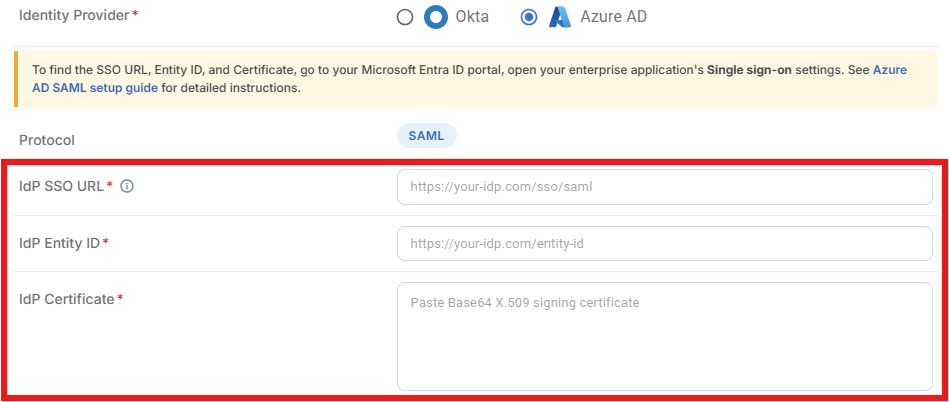
The next three fields are the IdP Configuration Fields.
-
IdP SSO URL
-
IdP Entity ID
-
IdP Certificate
-
-
To enter the values for these fields, go to your Microsoft Entra ID portal, open your enterprise application's Single sign-on settings.
-
Follow the below section to get these values or follow the Azure AD SAML setup guide for detailed instructions.
Step 2: Configure Azure
-
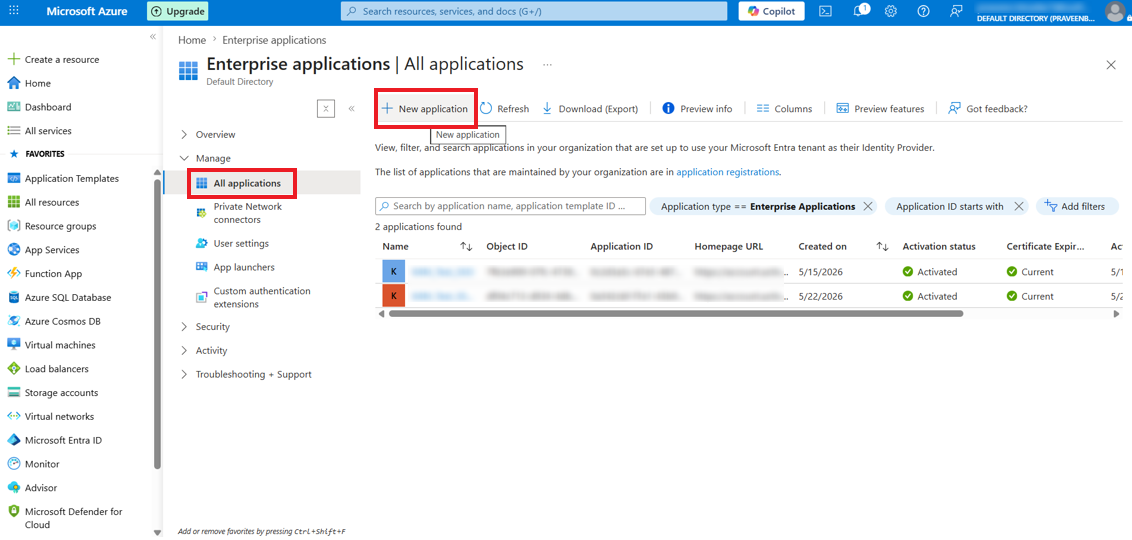
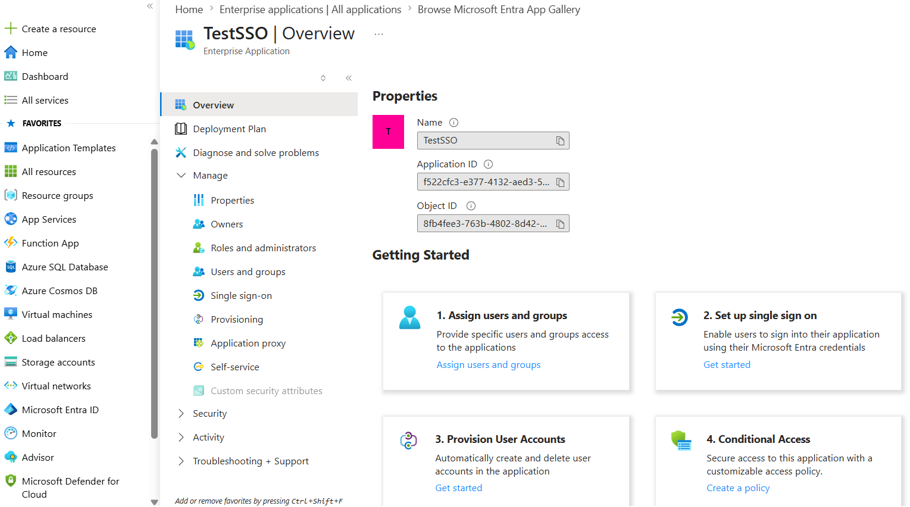
Log in to the Azure Microsoft Entra ID portal.
-
Search for Enterprise Applications.
-
Select All Applications from the left menu bar.
-
-
Select + New Application.
-
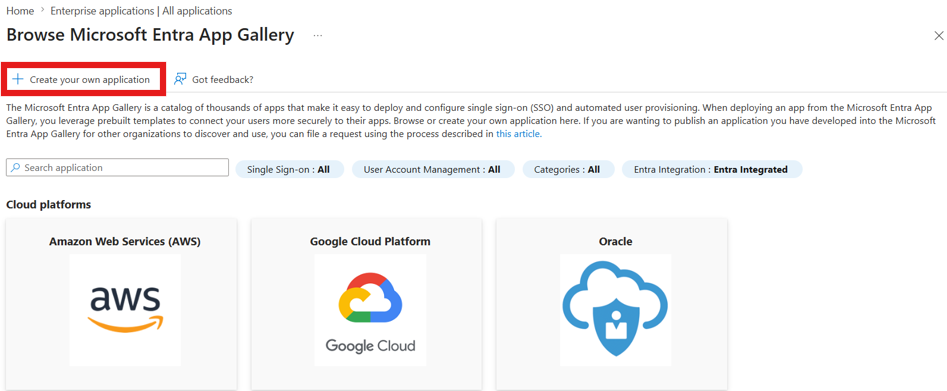
Select + Create your own application.
-
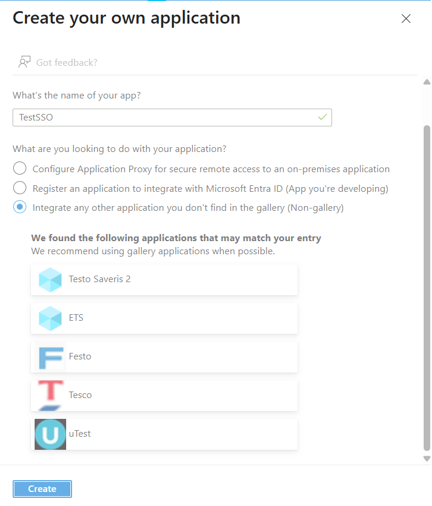
Enter the Name of the application.
-
The Overview screen of the application opens.
-
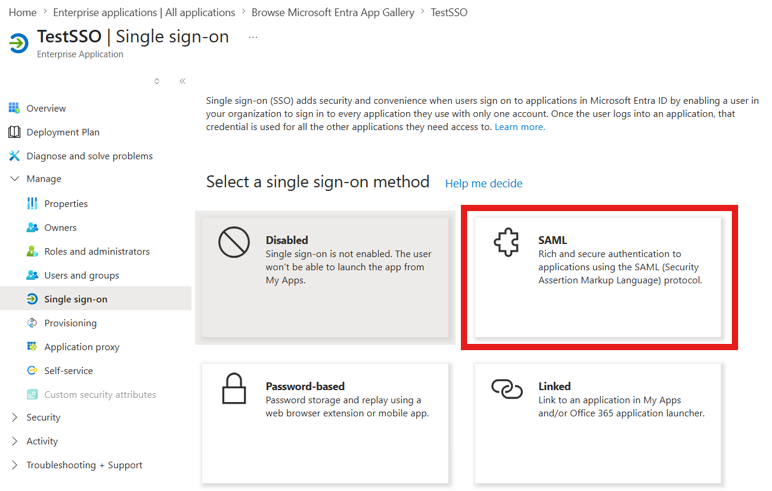
Select the 2. Set up single sign on option.
-
Select the SAML option.
-
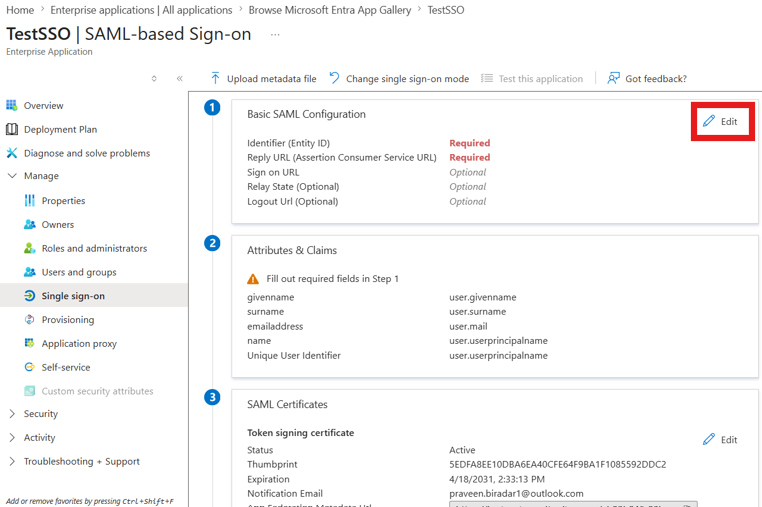
Select the Edit icon in the Basic SAML Configuration section.
-
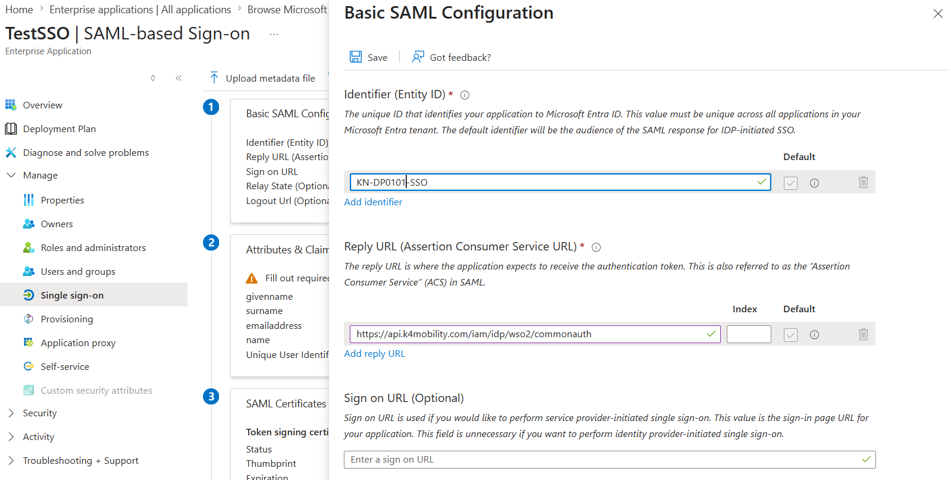
Enter the SP Entity ID copied from EpicLink into the Identifier (Entity ID) field.
-
Enter the ACS URL copied from EpicLink into the Reply URL (Assertion Consumer Service URL) field.
-
Click the Save button. The SSO configuration is saved.
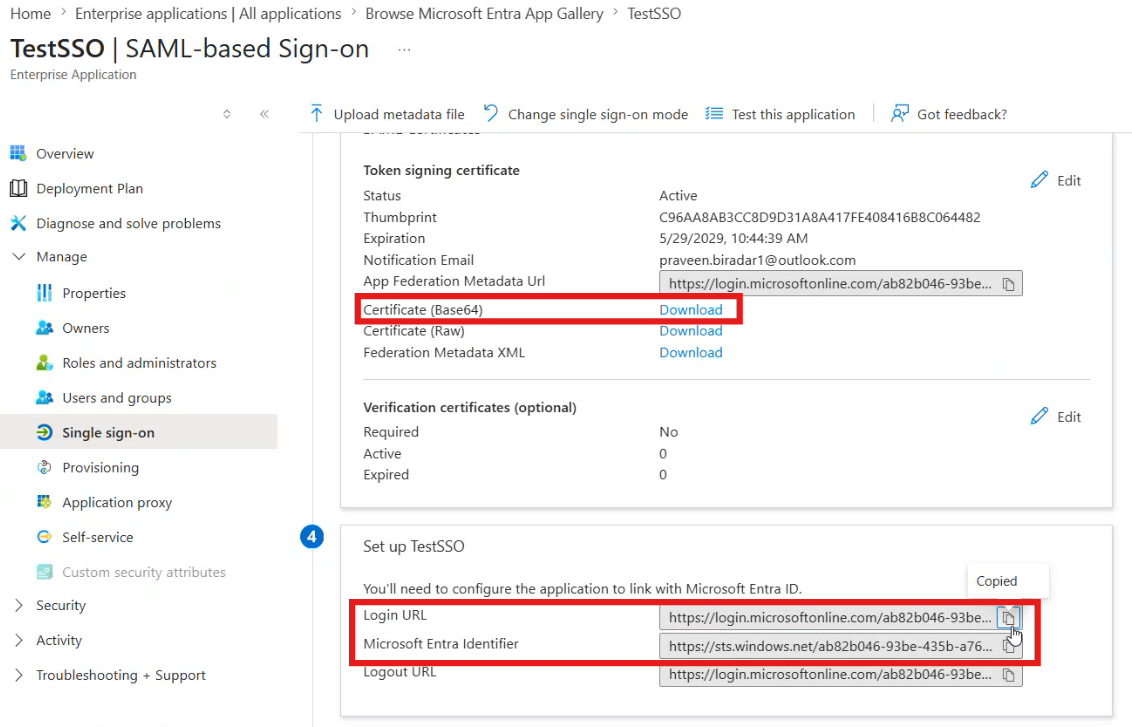
Step 3: Retrieve IdP Details from Azure
-
After completing the Azure setup, collect the following values from the Microsoft Entra portal.
-
Scroll down to section 4 Set up <application name>
-
Copy the Login URL value.
-
Copy the Microsoft Entra Identifier value.
-
Download the Certificate (Base64).
-
Open in a text editor
-
Copy only the content between:
-
-----BEGIN CERTIFICATE----- -
-----END CERTIFICATE-----
-
-
-
These information from this page has to be pasted on the SSO Settings tab in Account Management screen to complete the configuration.
Step 4: Complete Configuration in EpicLink
-
Return to the SSO Settings screen in EpicLink.
-
The values obtained from Azure configuration page has to be pasted on the SSO Settings tab in Account Management screen as mapped in the table below to complete the configuration:
|
Values from Azure Console |
SSO Settings tab in EpicLink |
|---|---|
|
IdP SSO URL |
|
IdP Entity ID |
|
IdP Certificate |
-
Click the Save button.
-
SSO setup is now complete. SSO authentication via Azure is enabled.
Group Role Mapping
-
The Group Role Mapping section is used to map roles defined in your Identity Provider (Azure) to access policies within the EpicLink Portal. This allows administrators to centrally manage user permissions through their Identity Provider instead of assigning permissions manually in the portal.
-
When a user signs in through SSO, the EpicLink Portal checks the user's assigned role in the Identity Provider and automatically grants the corresponding EpicLink portal permissions.

For example:
|
Identity Provider Role in Azure |
EpicLink Portal Access |
|---|---|
|
Read |
Read Access |
|
Support Read |
Read Access |
|
Admin |
Admin Access |
|
Starlink Admin |
Starlink Admin Access |
-
This ensures that users receive the correct permissions immediately after login without requiring manual role assignment in the EpicLink Portal.
Adding a Role Mapping
-
Click + Add Group Mapping.
-
Select the role configured in your Identity Provider.
-
Select the corresponding EpicLink Portal access policy.
-
Save the mapping.
After the mapping is created, any user belonging to that Identity Provider group automatically receives the mapped EpicLink Portal permissions when they authenticate through SSO.
When should you configure this?
Configure Group Role Mapping when:
-
Different teams require different access levels.
-
User permissions are managed through Azure groups.
-
You want user access to be automatically controlled by the Identity Provider.
-
You want to eliminate manual permission management in the EpicLink Portal.
Example:
An organization has separate Azure groups for Network Administrators and Support Engineers. Administrators can be mapped to Admin Access, while Support Engineers can be mapped to Support Read Access. When users are added or removed from these Azure groups, their EpicLink Portal permissions automatically update during SSO login.
Default Policy
-
The Default Policy determines what access level is assigned to SSO users who successfully authenticate but do not have any matching Group Role Mapping configured.

-
When a user signs in through SSO:
-
The system checks whether the user belongs to a mapped Identity Provider role.
-
If a matching role mapping exists, the mapped EpicLink Portal access policy is applied.
-
If no matching role mapping exists, the system applies the selected Default Policy.
-
-
Enable the Deny access if no group rule matches checkbox, if you want users without a mapped role to be blocked from accessing the EpicLink portal.
-
When Deny access if no group rule matches checkbox is enabled:
-
Only users with a valid Group Role Mapping can log in.
-
Users without a matching role are denied access.
-
-
When Deny access if no group rule matches checkbox is disabled:
-
Users without a matching role receive the permissions defined in the Default Policy.
-
-
When should you configure Default Policy?
-
Use a Default Policy when:
-
All authenticated users should receive at least basic access.
-
New users should automatically receive limited permissions until role mappings are configured.
-
You want to simplify onboarding.
-
Example:
Set the Default Policy to Read Access so newly onboarded users can view information immediately, even if their Azure role mapping has not yet been configured.
When should you configure Deny access checkbox?
-
Security requirements demand explicit role assignment.
-
Only approved users should access the platform.
-
You want strict access control.
Example:
A managed service provider allows access only to users assigned to specific Azure groups. Any user without a mapped role is denied access.
Inactive Account Deletion (days)
-
The Inactive Account Deletion (days) setting controls how long an SSO user account can remain inactive before it is automatically disabled within the EpicLink Portal.
-
Specify the number of inactivity days.
-
If an SSO user does not log in during that period, the EpicLink Portal automatically disables the account.
-
The user remains in the Identity Provider (Azure) and is not removed from the Identity Provider.
-
An administrator can later re-enable the account if required.
Note: This setting only affects the EpicLink Portal account. It does not delete or disable the user in Azure.
When should you configure this?
Configure this setting to:
-
Reduce security risks from dormant accounts.
-
Automatically disable unused accounts.
-
Maintain compliance with internal security policies.
-
Keep user records clean and manageable.
Example:
If the value is set to 30 days, a user who does not log in for 30 consecutive days is automatically disabled in the EpicLink Portal. An administrator can later re-enable the account if access is required again.
Allow Sub-Organizations to Use this SSO
-
The Allow Sub-Organizations to Use this SSO option extends the configured SSO integration to child organizations beneath the current organization.
-
By default, the SSO configuration is available only to the organization where it is configured.
-
When this option is enabled:
-
Users from subordinate organizations can also authenticate using the same SSO configuration.
-
Child organizations inherit the configured Identity Provider settings.
-
A single SSO configuration can be shared across an organizational hierarchy.
-
When should you configure this?
Enable this option when:
-
Multiple business units share a single Azure tenant.
-
Parent organizations centrally manage authentication.
-
You want a single SSO configuration across all subsidiaries or departments.
-
You want to avoid maintaining separate SSO configurations for each child organization.
Leave this option disabled when:
-
Each sub-organization manages its own Identity Provider.
-
Different child organizations require separate authentication configurations.
-
Access needs to be isolated between organizations.
Example:
Consider the following hierarchy:
-
ABC (Parent Organization)
-
A1 Mobility India
-
A2 Mobility US
-
A3 Mobility Europe
-
If SSO is configured at ABC organization:
-
Enabled: Users from A1 Mobility India, A2 Mobility US, and A3 Mobility Europe can also authenticate using the same SSO setup.
-
Disabled: Only users belonging to ABC organization can use the SSO configuration.
Limitations
-
Orbit-Only Support
-
Single Sign-On (SSO) authentication is currently supported only for Orbit Services - Orbit Browser and Orbit Mobile App.
-
SSO integration for Konnect is not currently available and is planned for a future release.
-
-
Organization-Wide Role Assignment
-
SSO role mappings are applied at the organization level and are inherited by all child organizations (sub-organizations).
-
For example, a user assigned an Admin role through SSO for an organization will automatically receive Admin access to that organization and all of its sub-organizations.
-
Assigning SSO permissions that are restricted to specific sites or individual sub-organizations is not supported.
-
Granular access control based on site-level or sub-organization-level restrictions cannot be enforced through SSO role mappings.
-