
The Sites screen is the landing page of EpicLink. The user is automatically directed to the Sites screen after login. This screen shows an SD-WAN summary of the sites within an organization. It shows a high-level overview and summary data of all of an Organization’s sites.
-20250717-130958.png?cb=bd41765e681ff028fdf80cf5ee47b659)
-
In the Organization field, select the Organization or sub-organization from the dropdown menu. The logged in admin Organization is populated by default here. This is the organization corresponding to the email ID used to login.
-
The dropdown list consists of all the sub-organizations under logged in admin organization.
-
In the Sites field, select the required sites from the dropdown menu. The dropdown menu consists of all the sites associated with the selected Organization and sub-organizations.
-
Select the Period if necessary.
-
The Sites screen contains six data summary cards:
-
Sites
-
Internet Links
-
Cellular
-
Starlink
-
VSAT
-
Wifi
-
Ethernet
-
LBand
-
Oneweb
-
Starlink_R
-
-
The Site table lists all the selected sites.
-
Each site can have multiple devices deployed on it and each device can have multiple WAN interfaces through which it obtains internet connectivity.
-
The Site table displays:
-
Site
-
Organization
-
Location
-
Usage
-
Quota
-
Availability
-
Top Apps
-
Clients
-
Services
-

-
Internet Online / Internet Offline
-
-

-

-

-
-
Portal - Link to connect to the Edge Portal
-
-
The SEARCH field can be used to search for the Sites based on the Site Name/Organization/Location.
-
The FILTER button helps the user to filter the table based on their Internet Status (Online/Offline/Inactive).
-
Click Download button to download a local copy of the Site table information in CSV format.
Multi Path Sat-Elite (MPK)
-
Under the Services column, click the
-
The MPK feature will be available for the user only if any one/both of the following conditions are satisfied.
-
Advance Bonding should be enabled
-
VTP should be enabled in any interface
-
-
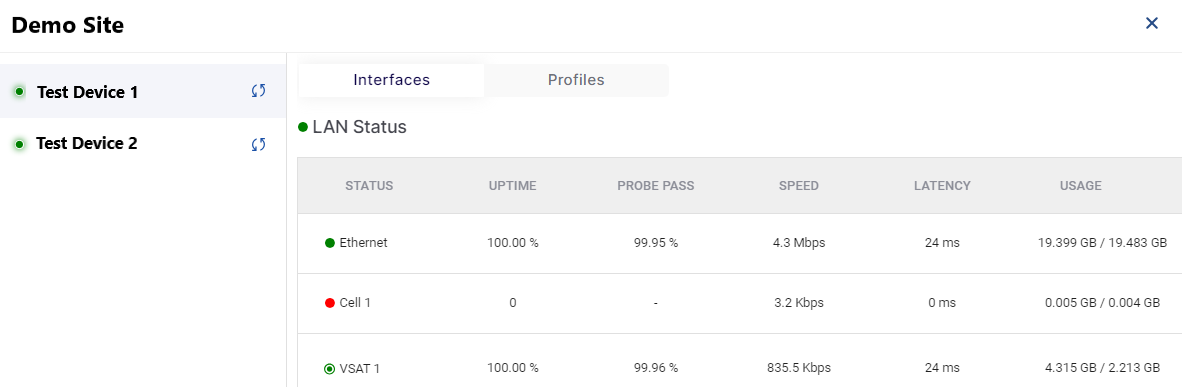
Using the MPK feature, the user can view the Internet Status of the Interfaces and WAN profiles for the selected site.
-
The dialog box opens as shown below:
-
On the left side of the dialog box, it shows the name of the selected site and lists all the devices deployed at the site.
-
Select the required device.
-
The right side of the dialog contains two tabs: Interfaces and Profiles.
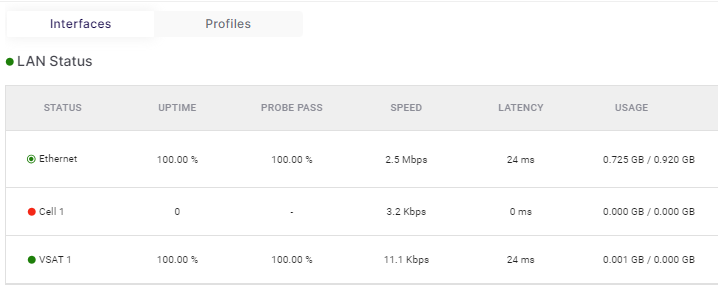
Interfaces
-
By default, Interfaces tab is selected. This tab show the Internet Status summary of all the Interfaces configured in the selected device.
-
It shows the following information:
-
Status - The list of all interfaces configured in the selected device. The color coding shows the Internet Status of these interfaces.
-

-

-

-

-
-
Uptime - Percentage of time that a link/interface is up.
-
Probe Pass - Percentage of successful probes in the given timeframe.
-
Speed - Internet speed or transfer rate, in Mbps.
-
Latency - RTT (Round Trip Time) it takes for a data packet to travel from the source to the destination and back again, in ms.
-
Usage - Total data consumed (download and upload), in GB.
-
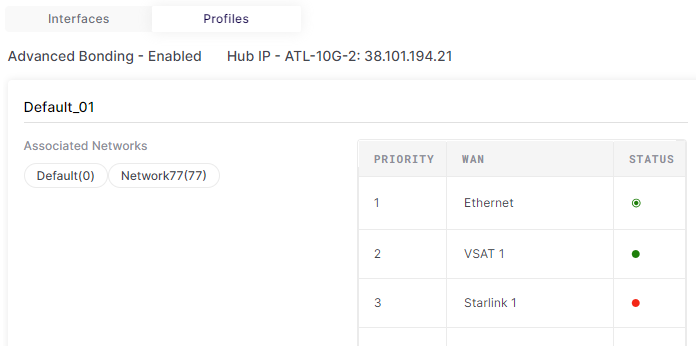
Profiles
-
Click the Profiles tab to view the Internet Status summary of all the WAN Profiles configured in the selected device.
-
The dialog box shows the following information:
-
The list of WAN Profiles configured in the system
-
The Access Networks associated with the WAN Profiles
-
The priority order of the WAN Links for each WAN Profile
-
The Internet Status of each of the WAN Links. The color coding for the internet status is the same as mentioned in the above section.
-
Opening any Site from the Sites screen
-
The user can directly access each individual site and the devices present at the site, by clicking on the Site Name.
-
Select the required Site.
-
The following screens become available for the user: