
To configure an Access network as Captive, the admin must first create the access network and associate it with an Interface in the Interfaces screen.
-
Log on to the OpenEdge System. The home page appears.
-
Select Interfaces from the side bar. The Interfaces will be selected by default.
-
Select the Add New Interface button to add a new Access Network.
-20250403-100848.png?cb=320c657f3b7aca4a57b106dd69f9031a)
-
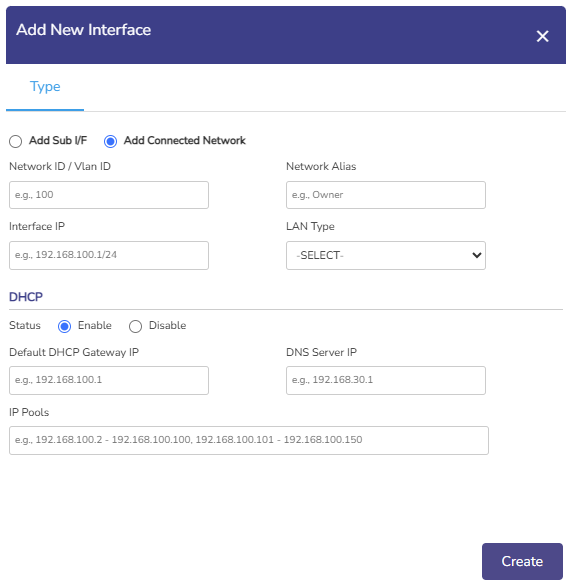
Select the Add Connected Network button.
-
To enter data in the respective fields, see table below.
|
Fields |
Description |
|
Network ID |
Enter a unique numeric ID from 2 to 4090. Network ID is also known as a VLAN ID. Once the network ID is configured, user cannot modify or update the VLAN ID or network ID in the future. |
|
Network Alias |
Enter a unique alias of the network. |
|
Interface IP |
Enter an interface IP address and subnet mask. |
|
LAN Type |
Select the LAN Type from the dropdown menu. |
|
DHCP Settings |
|
|
Status |
To enable DHCP so that a DHCP can automatically assign the IP address and the other allied configuration details to a host on a network to communicate with the endpoints, click Enable. |
|
Default DHCP Gateway IP |
The default IP address becomes available. User can assign a new IP address. For this, click and delete the IP address and then assign a new IP address. |
|
DNS Server IP |
The default IP address becomes available. User can assign a new IP address. For this, click and delete the IP address and then assign a new IP address. They can assign a maximum of three DNS IP addresses. |
|
To configure the DNS proxy, perform the following steps. Steps
By default, the status Not In Use is displayed. |
|
|
To remove the DNS proxy, perform the following steps. Steps
Or,
The status Not in Use is displayed, see Figure Configure DNS Policy (Not in Use). |
|
|
IP Pools |
The default sequential range of the IP addresses becomes available. User can assign a new range of the sequential IP address. For this, click and delete the IP address range and then assign a new sequential range of the IP address. User can assign multiple sequential IP address range excluding the specific IP addresses of that range. This is an example. 192.168.10.2-192.168.10.100, 192.168.10.151-192.168.10.200, 192.168.10.220- 192.168.10.254 The following IP addresses will not be assigned to the device in the network.
DHCP will assign the IP address to a device on the specified network based on the IP address range. |
-
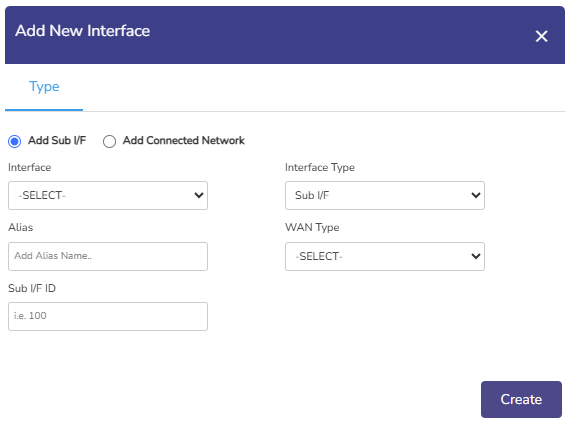
Click the Add Sub I/F button.
-
Select the Interface from the dropdown menu.
-
Select the Interface Type.
-
Select the SSID.
-
Enter an Alias for the Interface.
-
Select the WAN Type.
-
Enter the Sub I/F ID.
-
Click the Create button to save the changes.
-
Select the Captive Access from the side bar. The Networks tab will be selected by default.
-
In the Select Access Network field, select the required Access Network from the dropdown menu.
-
Click the Confirm button to configure the access network as a Captive Access network.